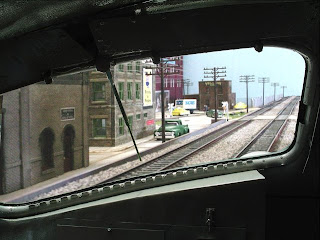
A while back I did a little experimenting with Photoshop by taking images I found on the internet that were of real views from inside the cab of different engines. This experiment, as you will see, led to views from inside other things besides engines. The trick here is to use your imagination and your mind's eye and try to see your layout from its population's perspective. In your own personal experience, try and think of the environments you tend to view trains from: through a window at work, from the car at a crossing, even through the window of a passenger car on the opposite track.
This project shouldn't be something frustrating or time consuming ... just a way to have fun with your scenery and your layout. I am always looking for ways to include other 'non-trainiacs' in my hobby, and this provided a unique and amusing way to do so. Ask for ideas, mostly from people outside of the hobby or interest. I have found that those living 'outside the box' often have the most unique and relevant ideas.
This was a view I found from inside an FT at Spencer shops in North Carolina. You can use shots from your own personal collection, or using the limitless power of the internet, you can track down other interesting and unique material for your project.

The way I created these "views" was really quite simple. Of course you need to have a version of Photoshop, or some other photo editing software that allows you to work in layers. Layers allow you to add or delete, text, images, etc. without changing the original layer. This way if you make a mistake you can delete that layer and retain the rest of the image. For those who aren't used to this technical term, layers is exactly what you would expect. Think of each layer printed on transparent paper with only what you highlight remaining. So if you had two layers, the last layer would be the background with the top layer being the foreground.
This project shouldn't be something frustrating or time consuming ... just a way to have fun with your scenery and your layout. I am always looking for ways to include other 'non-trainiacs' in my hobby, and this provided a unique and amusing way to do so. Ask for ideas, mostly from people outside of the hobby or interest. I have found that those living 'outside the box' often have the most unique and relevant ideas.
This was a view I found from inside an FT at Spencer shops in North Carolina. You can use shots from your own personal collection, or using the limitless power of the internet, you can track down other interesting and unique material for your project.

The way I created these "views" was really quite simple. Of course you need to have a version of Photoshop, or some other photo editing software that allows you to work in layers. Layers allow you to add or delete, text, images, etc. without changing the original layer. This way if you make a mistake you can delete that layer and retain the rest of the image. For those who aren't used to this technical term, layers is exactly what you would expect. Think of each layer printed on transparent paper with only what you highlight remaining. So if you had two layers, the last layer would be the background with the top layer being the foreground.
This view shows the image with the windshield deleted.
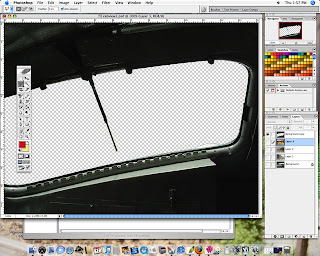
I started by duplicating the original layer, then hiding the original layer. Next taking one of the marquee tools, lasso or pen tool, I traced around the window opening, where the windshield glass is. After this is highlighted, ants marching, I deleted the area. Next I found photos I had of either my layout or modules and copied these into the image on a separate layer. The layer with the model image is then moved below the modified cab image and above the original layer. Some transforming of the model image was done, either reducing the size or distorting to get the proper perspective.
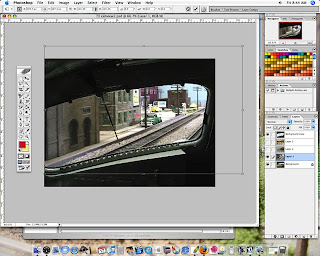
In the above screen capture shot, you can clearly see the unique effect this kind of photo editing can have on a seemingly ordinary layout photograph. Height above the rail and angle on your shot is key to selling the illusion, so keep this in mind when taking photographs of your layout to use for this project.
For you Pennsy fans, a view from the cab of a GG1. The view of the model world has the color toned down to more closely match the cab.
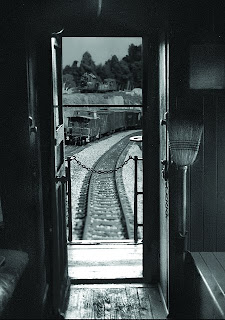
View from a caboose. In this image I changed the model photo to black and white to match the "real" image.
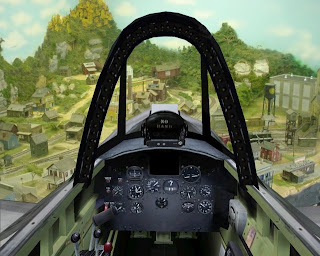
Ariel view from from the cockpit of a P47. This was on sort of a dare from a friend: TALLY HO!
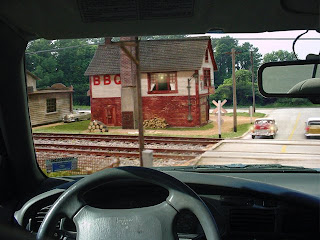
View from the Camry. I had to sit in the backseat to get enough cab detail. "Objects in mirror are closer than they appear" ... even in 1/48 scale!
As with many things in our hobby, the route I took concerning this project was not the intended one. In the past, I had seen photos in which a mockup of a simple interior was used as a 'window' from which to shoot a layout or module scene. Originally, I planned to build such a mock up using a printout of an FT cab as a template and afixing it to a piece of foamboard with the windshield cut out. This seemed like an awfully lot of work for a few shots, so in an effort to save a little time I gave the idea a shot in Photo-Shop ... and the rest, as they say, is Token history!
I hope you enjoy this little project and look forward to seeing your own "Views From the Cab" over on the OGRR forum.


3 comments:
vulcan: let me be the first to say nice work! what an imaginative post ... i'm sure others will appreciate your ingenuity. we need more fun posts like this.
vulcan
this approach is just great!
I really like this "out of the cab" thinking.
There are so many ways we can have fun with our hobby as long as we can keep an open mind.
Thanks for the great "how to"
Nice job Vulcan ! What an original idea. Thanks for taking the time to do the How-To
Post a Comment