Wednesday, January 30, 2008

Bassette Printing Co: Project by Ray

After my experience building the "Tenament Flat" my next project was a manufacturing company flat.
I am lucky enough to have CAD software and was able to create a 3d surfaced model in the computer of what I wanted and from there get all the dimensions needed. This of course is not necessary as it could be drawn on paper manually.
I decided to use black foam board and knowing all the sizes and shapes needed was able to draw them all on the foam board prior to cutting to get the least amount of waste.

Photobucket

After cutting out for the windows and doors, I used hot wax to glue the walls together.
Do not glue the windows and doors until after the veneer siding is installed.

Photobucket

To strengthen the assembly I used wood glued to the walls with yellow glue.

Photobucket

Test fitted the structure in place after building a base to hold it.

Photobucket

Siding (plastic from Precision Products) was cut to size and installed

Photobucket

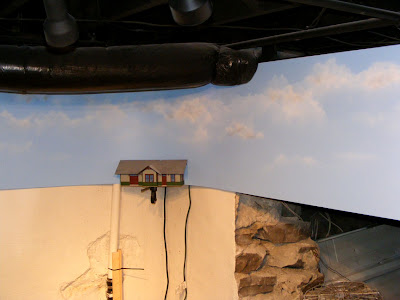
Finished unit with details, lights and secured to wall.
I decided to name it Bassette Printing Co. in honor of that fine family.

Photobucket

Achieving That Rustic Look on Styrene: Project by Vulcan

As the old saying goes, in regards to house-painting, “you don’t buy paint, you just rent it”.

As part of the module project, mentioned in the mail crane “how-to”, I built a small rural station. This post is not about the station but how I accomplished the “rustic” , peeling paint, look.

I used Evergreen Models styrene siding: Novelty, Item No. 4150. Before cutting out the individual wall pieces I use a fine tooth razor saw as a scribe, using a slight side to side motion, to add some woodgrain detail. The Evergreen styrene is smooth with no detail. In the second photo below I applied an ink/alcohol wash just to highlight the details for clarity.


Drawing pencil lines where I want nail holes, I use a scribe and add the nail holes. 2 per board


The parts are then painted ColorPlace (Walmart) Almond. This is enamel paint which is important to use because the following steps will not
effect the paint. After the paint is dry I lightly sand to tone down the sheen and highlight the woodgrain texture.


Then using Gray acrylic (or whatever the final wall color will be)I brush paint the walls. Not worrying too much about the coverage.


When the gray is dry or at least not shiny wet, this doesn't take long at all, I go over it with a light ink/alcohol wash.

When the I/A wash is nearly dry I use a piece of cloth and dab lightly on the walls until the paint begins to pull from the wall.


The rusty nail holes were done using a fine paint brush and raw sienna acrylic paints.
Brushed on and almost immediately wiped off.

The final result.


Tuesday, January 29, 2008

Tenement Flat Construction: Project by Ray

This is a scratch-built tenement flat done as a project to learn this art. On this build I used white foam core but would not recommend it. All future builds will be done with black foam core as it is much easier and cleaner to work with. Also used wood siding from Mt. Albert Scale Lumber Co., very good quality but there are many other good suppliers of wood or plastic veneer. Made the cut out for all the windows using the actual windows as templates. The windows, doors, stairs and railings come from Grandt and Tichey. Also started the porch.

Photobucket

Photobucket

Structure is finished but will need the porch and finish painting.

Photobucket

The porch was built as a separate entity and can be attached with one lever.

Photobucket

The porch foundation is made from wrapping wood pieces with printed out brick paper.
Paint, weathering and details are added.

Photobucket
Curtains are from the sewing box, the trim used on clothes
Lights are added inside and out

Photobucket

Photobucket

Background Cloud Painting: Project by CSX Al


One project that I recently needed to complete on the layout was painting the backdrop before finishing building the rest of my benchwork. I had been putting off this task for a while, since I had reservations on how realistic I could paint clouds. I had originally thought about just purchasing a photo background mural but the cost can be quite expensive since I needed to cover lineal feet at 24” high. Anyway, I found my local hobby shop carried some cloud masks made by New London Industries. There were 5 different cloud edge patterns on heavy card stock for about $10.


I have also found you can get the same masks on the web through
http://www.modelrailroadinguniversity.com/productstencils.html
I used sheets 2'x 8' x 1/8" MDF (Medium Density Fiberboard) attached to wood frames that hung from the ceiling joists. A 4x8' sheet runs about $6. Nice thing about it is, it bends well (12" curves in the corners), has no grain and is smooth. Then you Spackle the seams between the sheets just like you would drywall, for a seamless background.


I started by painting the background a good sky blue. The color I used was made by Behr available at Home Depot, called Horizon Haze # 540B (flat paint)


Wait until background color has dried before using the masks/stencils.


Next you need to use a flat white spray paint (in rattle can)

Place the mask/stencil on the background where you want the cloud and spray paint the white onto the background.

Tip: try to envision a direction the sun would be coming from to highlight the clouds and keep it consistent from cloud to cloud. I kept the highlight to the right side of my cloud edges. It is also better to spray lighter coats that heavier ones (you have better control).

As you spray along the edge of the mask/stencil make this the whiter edge and feather the paint down away . This will give the illusion of a darker/ bottom to the cloud. Keep moving your mask/stencil around trying and vary the mask/ stencils used to keep the clouds from looking alike.
Moving the mask/stencil differnent distances away from the background while spraying will give you sharper or softer edges to your clouds.
In a couple of my clouds I used a little bit of light gray primer paint (rattle can) to give even darker shadows in a few of my clouds.


Below is my first attempt


Here are my finished results


This was a very fun and satisfying project and only took a couple of hours to complete. If a cloud doesn’t turn out the way you like, you can always pull out the blue again and go over them. I did to my first clouds.
Have fun - CSX Al

Sunday, January 27, 2008

Learning to Build Mountains & Hillsides: Project by Gizzmo

I was rather successful on my first try at building mountains (a hillside really) and I thought I might share the progress with you here. Below's a shot of the 1st attempt. I should mention here that I learned this technique from watching Rich Battista's Black Diamond Railway DVD. It was a great help and I highly recommend having it in your DVD library.

Here's a look at the second hillside with some cardboard stapled on. I tried to imitate the stepped layered look of the first attempt


Here I've stapled on some construction paper that was first crunched up into a ball and then unfolded. You'll see I balled up some paper on the top right, to help give the illusion that the rocks continue on

I then covered the paper with dampened shop wipes dipped into a tub of Hydrocal plaster. This isn't the light version. It dries very hard. You could also use paper towels ... they're much cheaper!

Well the whole thing took about an hour's time. I went into the shop and cast some rocks and called it a day. BTW if you mix up too much Hydrocal don't rinse it down the drain!! I have no experience here but have been warned that it will harden in the drain. NOT GOOD! Instead, just keep stirring the plaster as it setup. Keep breaking up the lumps into large pea sized granules. Now save these, don't throw them out you'll need them later. Do this with any leftover plaster you have from your project. It will be used as a filler later.

After trimming up the rock castings with a little hand saw and fitting them roughly into place lets get to the business of mounting them. Strip up some wipes and placed them in a bucket of water. Then mixed up some Hydrocal. Soak the casting and the hillside with a strong spray of water. Now wring out a piece of wipe and dip it into the plaster. I put it on the back of the casting with a little extra plaster and hold it in place for a few seconds. Then Its off to the next. I use the wipes for two reasons."A" It allows me to start setting rock without having to wait for the plaster to thicken and “B”, it makes up the gaps that I get by setting my castings so vertical. I don't care for the look of the casting when they lay against the mountain and away from me. I want them to be straight up and down or maybe a little leaning in to create an overhang. But this crates gapes that need to be filled in. Here's a shot after the castings are attached.

I also use the wipes to fill in all of the lager gaps. Look to the end of the pointer.


Now its time to use the Lumpy plaster as described by Rich Battista. Before you start be warned , THIS IS MESSY! Take the time to cover your tracks layout floor and anything else that can be damaged. Also get a good sized and well functioning spray bottle ... you'll need it!

Take a coffee cup full of the granules I told you to save and add about one cup of plaster to it. Add 1/2 cup+ of water and mix. BTW I use gloves here. WORKING FAST, grab small handfuls of the mix and push it into the gaps. I work from the top down. Use your spray-bottle filled with water to wash of the face of the rock and to rinse away the plaster exposing the granules. Use plenty of water. I sop up the mess with paper towels and a large sponge. Just keep working in small batches. If the stuff sets up, not to worry: just stir it again until its consistency of small granules again and reuse it. Clean up the mess and your done!

Heres some shots of the finished, uncolored hillside:


Ok ... Its color time! Not much to show in the way of work. I used Scenic Express coloring in a spray bottle of about 32 oz of water and just sprayed it on. I used burnt umber, raw umber and slate. After it dried about an hour I had to put down some grass and such. Here's the hillside completed.


I really like the way this system works. The results are too good to be true: just
follow nature, use your imagination, relax and have some FUN !! Good luck !!

Wednesday, January 23, 2008

Making Custom Size Portals: Project by Gizzmo

In order to move forward on my layout,I found several portals of various sizes were needed. After searching the internet, magazine ads, and local hobby shops, I was disappointed in the available choices. For the few I did like, the sizes were all wrong for me. I have my tracks set rather far apart to accommodate the larger engines and passenger trains I run. So it seemed the only way to move forward was to reach into my bag of tricks again and make my own. First I went to the "National Model Railroad Association" website and found a section on templates. A template is nothing more than a shape that's used to setup the clearances needed for the opening in the portal. Here's a link to the site: http://www.nmra.org/standards/consist.html

I drew up what I wanted based mostly on intuition and visual appeal. The end result is a combination of portal styles I've seen and liked .I wanted to simulate concrete so I choose to cast them from plaster. I wanted the portals to be smooth so I built a form from scrap lexan and wood. When making your mold try to bevel all the edges of the pieces used to make the different shapes .It will aide in the removal of the casting. Here's a couple of pictures of my mold:


I cast the portal using Hydrocal Plaster from http://www.plaster.com/HYDROCAL.html. I dismantled the frame and very gingerly separated the casting from the form. I had a little spot on the mold that allowed the plaster to flow under it and that resulted in a chip . I fixed the gap on the next one. I also rubbed the surface of the mold with plain old pure silicon caulk and let it dry overnight. The caulk worked great and I've had no more chipping issues.


I made it bit tall to accommodate various locations on my layout but it can be trimmed down with a small hand saw. An important note here: Avoid grinding on Hydrocal with abrasives things like a Dremmel with a diamond cutting disk, belt sander, etc. and creating dust. Hydrocal, like most plasters and masonry products, contain crystalline silica. It's NOT in its finest (breathable) form in the plaster mix or casting and the MSDS (manufacturers safety and data sheet) will support this, but grinding it can free these particles into the air. This is a BIG DEAL!! Crystalline silica can cause CANCER!! So please, use a respirator or just don't cut/grind it with power tools. I use a small hand saw.

Here a couple more I made using this method:


The possibilities are endless. I'm rather pleased with the results. I could use some ideas on coloring it. I was thinking along the lines of a scenic express wash or something. I have several places that require rather large portals including one for a three rail tunnel. This should allow me to build any size I need.


Tuesday, January 22, 2008

Duplicating from a Master Piece: Project by Gizzmo

I have to face it ... I'm fussy. Do you ever know what you want but can't find it? That was the case with the brick work I wanted in a wall but couldn't find. Turns out, I had it in a pillar designed for a MTH girder bridge! I really liked the pattern and wanted to duplicate it but alas, it was not available as a pre-made form from any known scenic manufacturer. It was time to reach into my bag of tricks and MAKE what I wanted. Here is how I did it:

I ordered some mold making supplies from: http://www.smooth-on.com/ . I then cut out the flat parts of the pillar and trimmed them up so they would interlock. I made a small box and contact cemented the pcs to the bottom face up. I mixed up the mold making liquid and poured it in. After it set for a day (today) I pulled out the new mold, removed the masters, flipped the mold face up in the box to maintain the shape and poured in some Hydrocal Plaster .Here are the results.


I'll be using these all over my layout. It was a fast and useful project that I hope you can use too!

Monday, January 21, 2008

O Scale Mail Crane: Project by Vulcan

In late 2007 I began building a 40" x 18" O gauge display module. This project, the mail crane, is one of many smaller projects that make up the module. First the drawings and photos of the prototype.


The completed mail crane.
The crane is made using Evergreen Models Styrene tubing. The "ties" the crane is sitting on are 1/2 wood dowels.


This next shot shows the base, on the left, made from .030 styrene tubing glued inside a piece of .090 tubing and cut to a scale 3' length. The joint was covered with Testor's Contour putty and sanded to shape.
The largest piece of piping on the crane is made from .o65 tubing, as is the arms. The small vertical pipe is made from .035 tubing.
The footing, on the right, is made from one section of 1/2" styrene tile from Evergreen Models. The nut/ bolt casting's are from Grant Line Products and are actually large HO castings.


I have assembled the individual components. I add a .035 diagonal brace to the upper arm of the crane by crimping the ends of the tubing with a pair of needle nose pliers and bending to fit.
The mail bag was made using tissue paper coated with Mod Podge, a glue/sealer found at most craft stores, and built up in layers. A piece of string was tied around the middle to simulate a belt.
Here is a sketch I did highlighting some of the dimensions in O scale.


All in all, this was a quick, fun and relatively inexpensive project. Hope you enjoyed!