A few months ago when the idea of the Token Three Railer was just taking shape, many of the Token Builders proposed the concept of a "group build" as a possible way to bring modelers together around a common theme. Builds should focus on structures that every layout would need and that anyone with the time and supplies could pull off within a month's time. Since it would be difficult for everyone to agree on what build should get top billing, a poll was set up on the blog asking viewers which of several proposed projects garnered the most interest. When the vote count was finally tallied at the end of the month, the "Rural Water Tower" ended up as our March Token Build.

Four modelers participated in the project: Vulcan, mwb, dgauss, and bfishma and each brought not only a unique perspective, but their own modeling touch and ingenuity to the group build. The information contained here will hopefully highlight the different approaches as well as providing others with tips and ideas for this or other scratchbuilds.
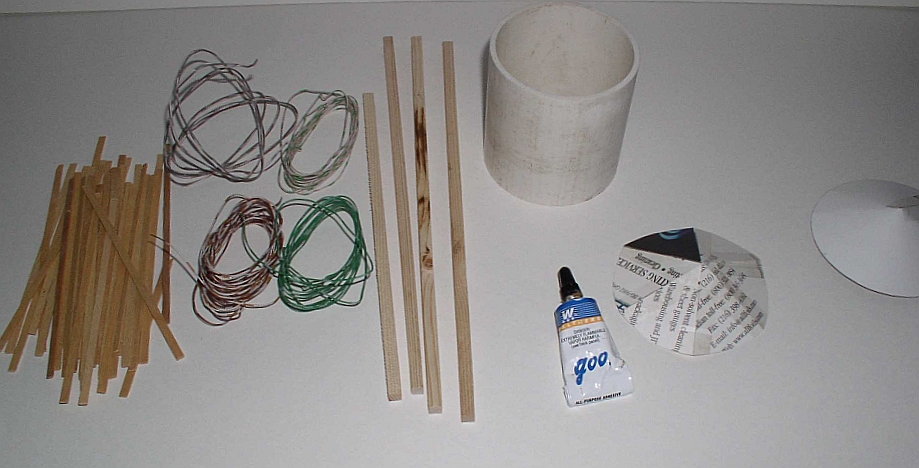
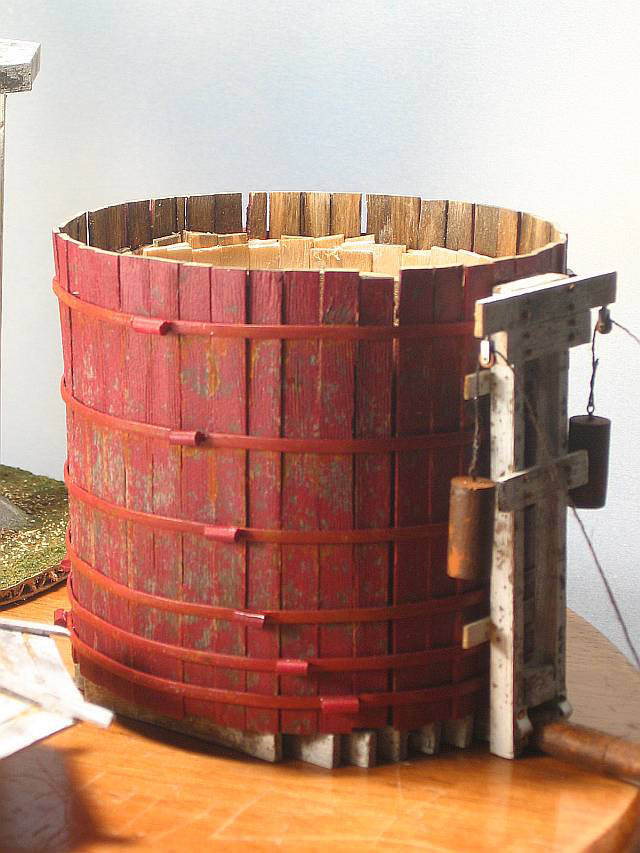
While some worked directly from actual blueprints of prototype structures, everyone seems to have opted to build their Rural Water Tower in separate sections: the holding tank, the support structure, and if applicable a roof. A 'template' such as a section of PVC pipe or a cardboard shipping tube was used in many cases to achieve a rigid base for the holding tank. If these items cant be found laying around the house or the garage, a trip to a hardware store or an office supply warehouse is all thats needed. Cut the tubular section to a height that matches your plans or is pleasing to the eye. Also take care in noting that the diameter of the tube matches the height proportionally.

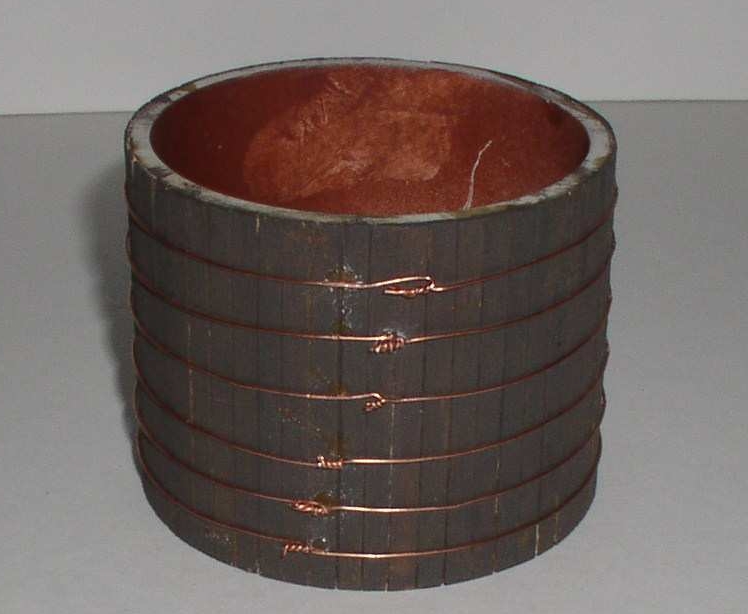
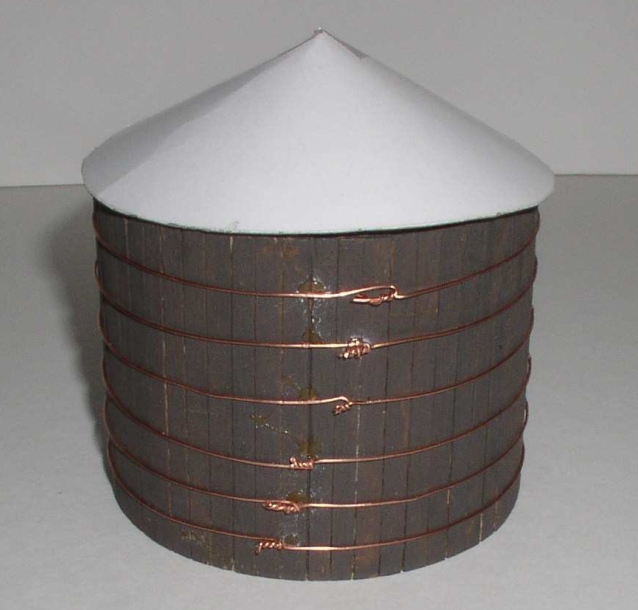
Wooden strips (known as 'staves' on the tower) were glued in place, side-by-side around the entirety of the cylinder. Strips can be cut from balsa planks, coffee stirrers, or in pre-cut pieces from the craft section of Walmart or Michaels bagged as "Skinny Sticks" by Forester. Work slowly and carefully, making sure that the lengths of the staves are consistent, and that they are flush with one another. Add a few rubber bands to ensure a tight fit while drying.

Next come the 'hoops', metal bands used to hold the staves together tightly. Once again, modelers used a variety of items to simulate these hoops. The bands can be modeled by using .030 styrene rod from Evergreen Scale Models, phone cord wire, or a product called "Rexlace" which is a flat vinyl craft plastic lacing. No matter what is used, the ends of the rods can meet flushly or can overlap. Turnbuckles used to secure the hoops can be simulated by thicker sections of styrene rod cut and glued in-place, bought from a detail company such as Grandt Line, or even twisted together forming a realistic turnbuckle where they meet.

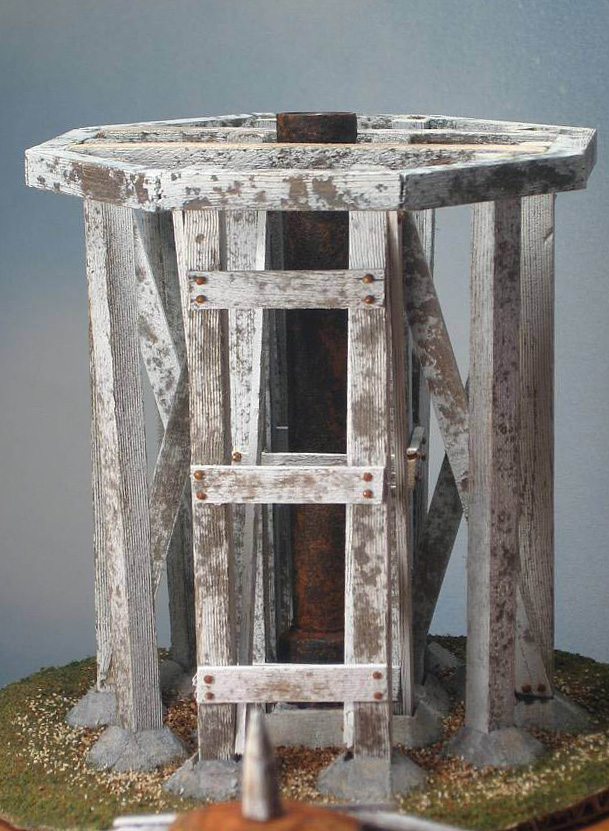
Stringers can then be added to the bottom of the holding tank, standing on end as to mimic most actual water towers. You can imagine how much weight a full tank can entail, so just as your deck's support beams run on end, so, too, do the stringers on a water tank. Once again, balsa or basswood strips can be used.

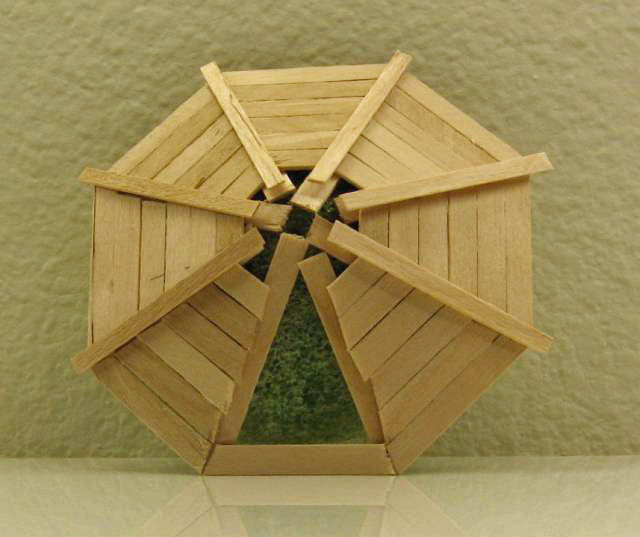
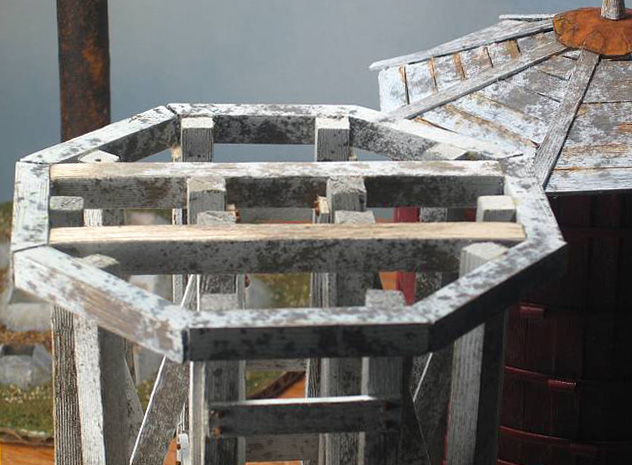
While some rural water tanks came without roofs, some did and this can be one of the more difficult parts of the structure to model because the height, diameter, and symmetry can be tough to accurately model. Triangular sections can be cut to size then glued together, cardboard or thick posterboard can be cut and rolled to match, or a base of foam board or styrofoam can be carved to form a base for wooden strips.
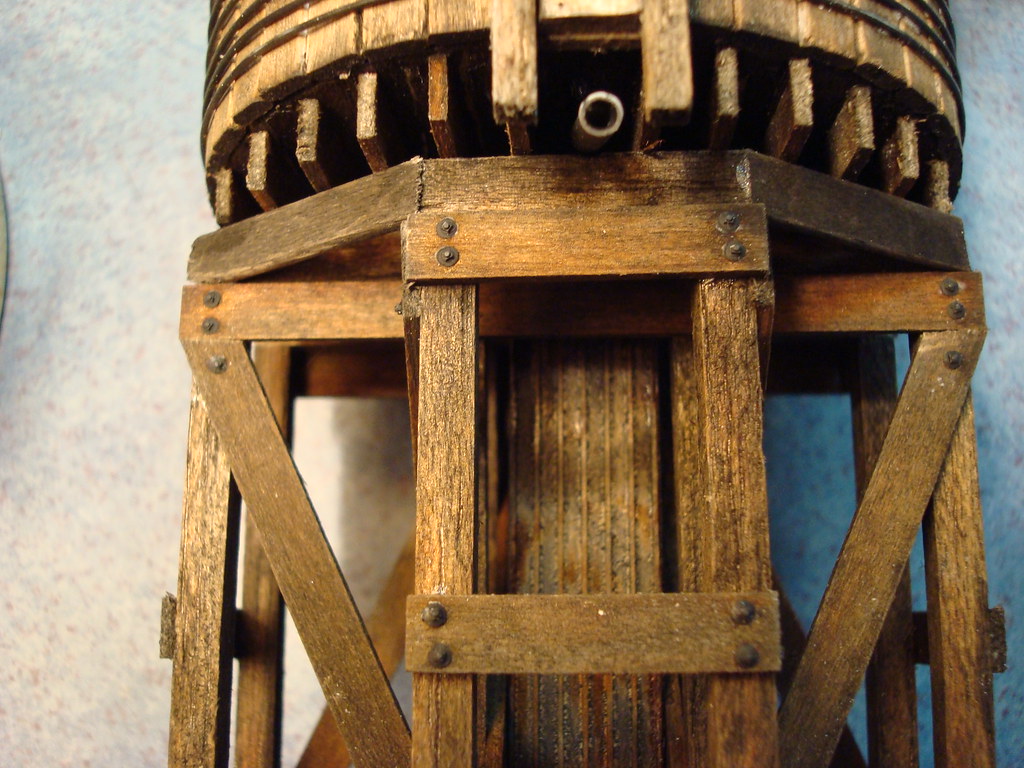
The support structure is the next logical step. Basswood or balsa wood in different sizes and thickness can be used both as the big timbers and the stringers that hold it together, a common size is for tank supports are 3/16" X 3/16" balsa wood dowels and 1/4" X 1/16" balsa sticks for the sway bracing. Whether working from plans or from your imagination, keep in mind that this structure must be rigid, well built, and well supported.
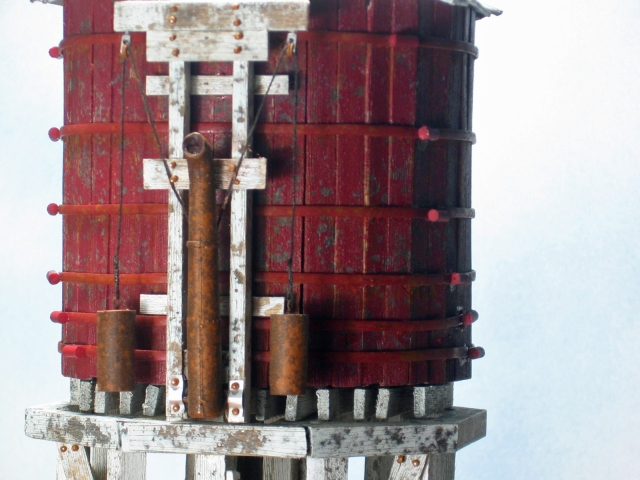
Now the fun part: the details! Spouts can be brought pre-made (once again from Grandt Line) or can be scratchbuilt. Vulcan describes his process below:
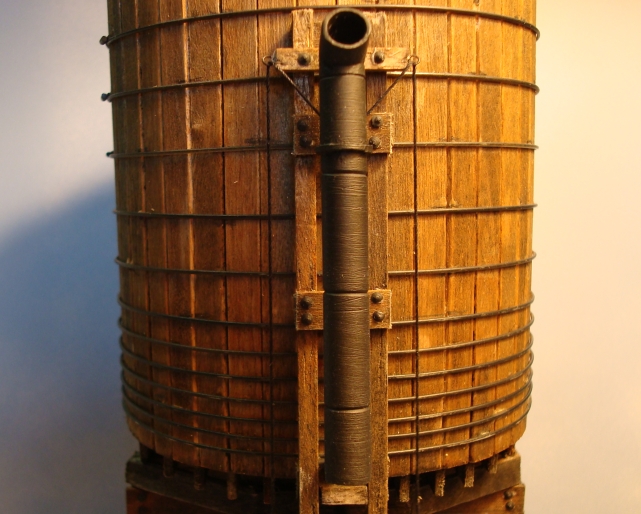
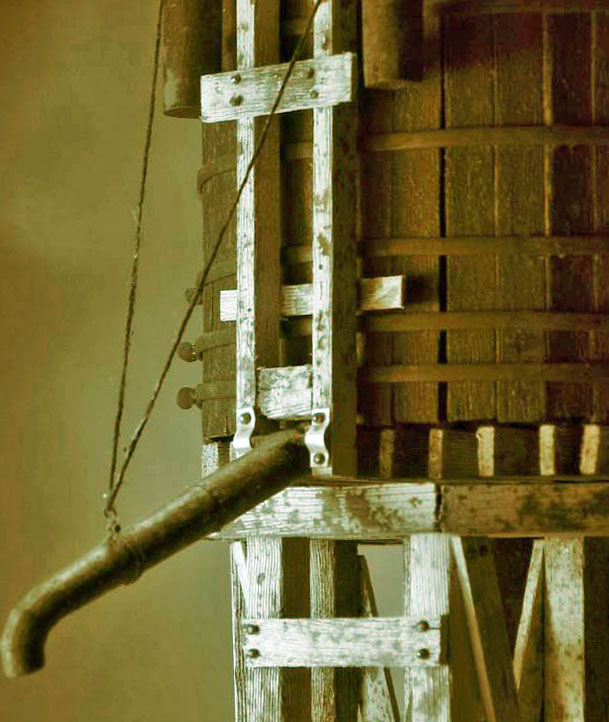
"My spout was made from styrene tubing. Cut to length, I then stuck it into an electric drill chuck and tapered the tube to a smaller diameter on the outside end using files and sandpaper. The grooves (joints) were also cut into the spout at this time. I cut the end at a 45 degree angle then glued another short section of tubing to the end to get the turned down portion. I made a hinge by taking a piece of brass sheet stock and Krazy gluing it to the spout and added a piece of brass tubing to the other end. "
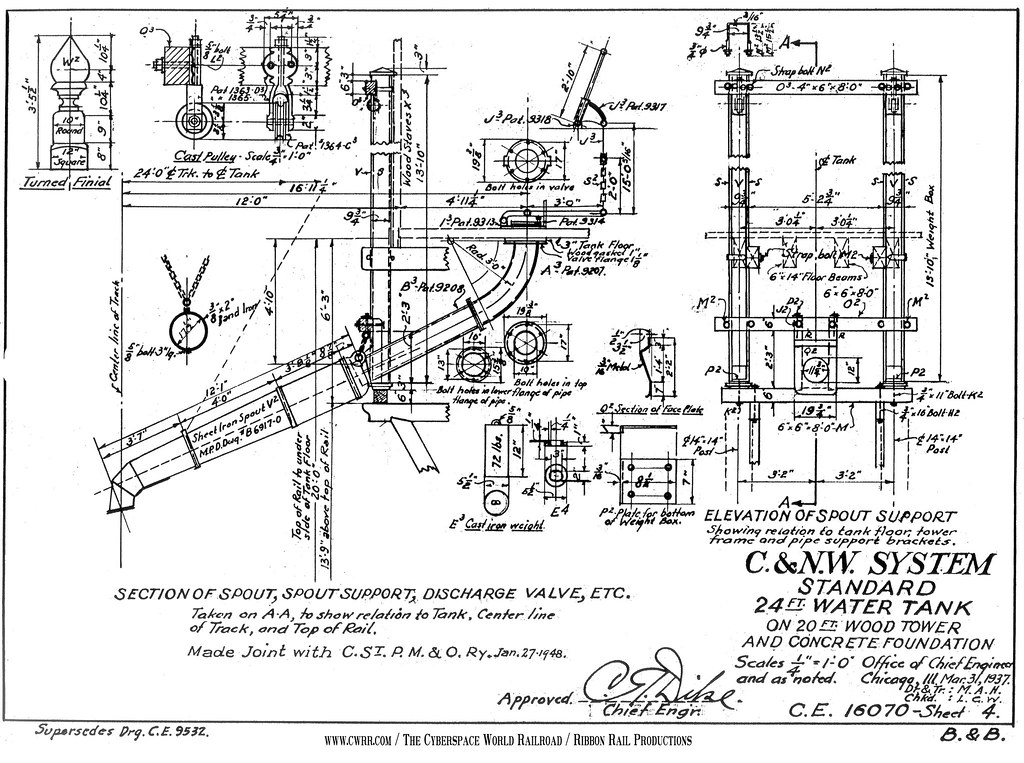
That spout is going to need a framework to support it and anchor it to the tank's structure as well as counterweights and perhaps a pull down chain for the spout. Other details can include the feed pipe running from the bottom of the tank to the spout, the pipe running from the ground to the tank, a water gauge, concrete stanchions to support the superstructure, a drain for the runoff, even a wind-vane on the roof-top! Vulcan's build based on Southern Railway plans didnt require a top which opened the door for another unique detailing project:

"Since my tank is open I added water. The water was made using a piece of clear blister material, commonly found in packaging now days. Using the tank as a guide I cut a circle out of the blister material and set it on the "shelf" formed by the shipping tube being cut shorter that the staves. The blister was then coated with numerous layers of Mod Podge. I usually did this when I was ready to put up the project for the night or had to let it set for a while while something else set up. I also added a few washes of green between some of the layers. The reason for the green is, I have a rain barrel set up outside and noticed when ever I got some of the water it always has a green tint to it. So it stands to reason an open tank could have the same effect."
Keep in mind, there is no right or wrong way to detail this project ... just do what feels right for you and your layout. Its our hope that this post and the build will benefit others as much as it has helped those of us involved. Please take the time to look over the choices for April's Token Build on the poll located to the right of this post. Your votes and feedback is greatly appreciated, as is your continued participation both here and on the Scenery Section of the OGRR Forum.


Four modelers participated in the project: Vulcan, mwb, dgauss, and bfishma and each brought not only a unique perspective, but their own modeling touch and ingenuity to the group build. The information contained here will hopefully highlight the different approaches as well as providing others with tips and ideas for this or other scratchbuilds.
While some worked directly from actual blueprints of prototype structures, everyone seems to have opted to build their Rural Water Tower in separate sections: the holding tank, the support structure, and if applicable a roof. A 'template' such as a section of PVC pipe or a cardboard shipping tube was used in many cases to achieve a rigid base for the holding tank. If these items cant be found laying around the house or the garage, a trip to a hardware store or an office supply warehouse is all thats needed. Cut the tubular section to a height that matches your plans or is pleasing to the eye. Also take care in noting that the diameter of the tube matches the height proportionally.

Wooden strips (known as 'staves' on the tower) were glued in place, side-by-side around the entirety of the cylinder. Strips can be cut from balsa planks, coffee stirrers, or in pre-cut pieces from the craft section of Walmart or Michaels bagged as "Skinny Sticks" by Forester. Work slowly and carefully, making sure that the lengths of the staves are consistent, and that they are flush with one another. Add a few rubber bands to ensure a tight fit while drying.

Next come the 'hoops', metal bands used to hold the staves together tightly. Once again, modelers used a variety of items to simulate these hoops. The bands can be modeled by using .030 styrene rod from Evergreen Scale Models, phone cord wire, or a product called "Rexlace" which is a flat vinyl craft plastic lacing. No matter what is used, the ends of the rods can meet flushly or can overlap. Turnbuckles used to secure the hoops can be simulated by thicker sections of styrene rod cut and glued in-place, bought from a detail company such as Grandt Line, or even twisted together forming a realistic turnbuckle where they meet.

Stringers can then be added to the bottom of the holding tank, standing on end as to mimic most actual water towers. You can imagine how much weight a full tank can entail, so just as your deck's support beams run on end, so, too, do the stringers on a water tank. Once again, balsa or basswood strips can be used.

While some rural water tanks came without roofs, some did and this can be one of the more difficult parts of the structure to model because the height, diameter, and symmetry can be tough to accurately model. Triangular sections can be cut to size then glued together, cardboard or thick posterboard can be cut and rolled to match, or a base of foam board or styrofoam can be carved to form a base for wooden strips.
The support structure is the next logical step. Basswood or balsa wood in different sizes and thickness can be used both as the big timbers and the stringers that hold it together, a common size is for tank supports are 3/16" X 3/16" balsa wood dowels and 1/4" X 1/16" balsa sticks for the sway bracing. Whether working from plans or from your imagination, keep in mind that this structure must be rigid, well built, and well supported.
Now the fun part: the details! Spouts can be brought pre-made (once again from Grandt Line) or can be scratchbuilt. Vulcan describes his process below:
"My spout was made from styrene tubing. Cut to length, I then stuck it into an electric drill chuck and tapered the tube to a smaller diameter on the outside end using files and sandpaper. The grooves (joints) were also cut into the spout at this time. I cut the end at a 45 degree angle then glued another short section of tubing to the end to get the turned down portion. I made a hinge by taking a piece of brass sheet stock and Krazy gluing it to the spout and added a piece of brass tubing to the other end. "
That spout is going to need a framework to support it and anchor it to the tank's structure as well as counterweights and perhaps a pull down chain for the spout. Other details can include the feed pipe running from the bottom of the tank to the spout, the pipe running from the ground to the tank, a water gauge, concrete stanchions to support the superstructure, a drain for the runoff, even a wind-vane on the roof-top! Vulcan's build based on Southern Railway plans didnt require a top which opened the door for another unique detailing project:

"Since my tank is open I added water. The water was made using a piece of clear blister material, commonly found in packaging now days. Using the tank as a guide I cut a circle out of the blister material and set it on the "shelf" formed by the shipping tube being cut shorter that the staves. The blister was then coated with numerous layers of Mod Podge. I usually did this when I was ready to put up the project for the night or had to let it set for a while while something else set up. I also added a few washes of green between some of the layers. The reason for the green is, I have a rain barrel set up outside and noticed when ever I got some of the water it always has a green tint to it. So it stands to reason an open tank could have the same effect."
Keep in mind, there is no right or wrong way to detail this project ... just do what feels right for you and your layout. Its our hope that this post and the build will benefit others as much as it has helped those of us involved. Please take the time to look over the choices for April's Token Build on the poll located to the right of this post. Your votes and feedback is greatly appreciated, as is your continued participation both here and on the Scenery Section of the OGRR Forum.

1 comment:
Great ideas, guys. I need to work on a "silverwood" stain recipe for aged wood. Any ideas?
Post a Comment