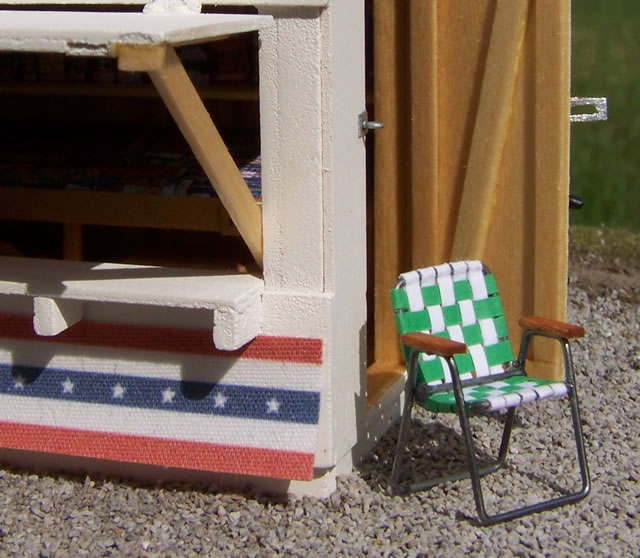
Folding lawn chairs are and have been a fixture in American life. Making an O-Scale lawn chair is a pretty straight forward project that only takes a 2 to 3 hours to make. You don’t need to be exact, and are only trying to capture the visual appearance of a folding lawn chair. To start this project, I would recommend either looking at a lawn chair you already own, or do a quick search on the internet to find a view that shows a lawn chair from the side. This will help you better visualize the angles of the back and the legs.
The basic frame for the lawn chair is galvanized steel wire that can be found at any home improvement store like Lowes or Home Depot. The steel wire is used for picture frame hanging, and can be found typically in the hardware section. For this project, I used 20 gauge or 22 gauge steel wire. Using your lawn chair or a photo as a guide, take a pair of needle nose pliers and bend up the frame that will make the seat and back portion of the chair. As you bend the wire into basically a rectangle that is bent in the middle, the wire will automatically take on proper looking curved bends at the corners due to the rounded tip of the pliers. This framework should be about 3/8” wide, with the lower seat section about 11/32” long, and the upper back section 17/32” long. These dimensions were just eyeballed by using a seated Arttista figure as a guide, and by looking pictures of a typical lawn chair. Keep in mind that these dimensions are not super critical. You will want to go with what looks right to you. The important thing is to make sure that the rectangle has close to 90-degree bends at the corners so that the rectangular frame is parallel across its width, and from lower front to upper back. Also, pay attention to the fact that the upper back on a lawn chair is not perpendicular to the lower seat. The back generally will tilt back about 15 to 20 degrees. To complete this frame, cut a straight piece of wire that is as long as your frame is wide, and use CA glue to attach it to the top of the frame at the bend between the lower and upper section. Without this wire, the webbing will not be able to bend around and go from the seat to the back, just like a real lawn chair.
Since it is practically impossible to replicate all of the folding tubes that make up the legs and arm rests, you only need to visually capture the look of this portion of the frame. Again., using the same steel wire and needle nose pliers, you will need to bend up this section to look similar to the photo below.
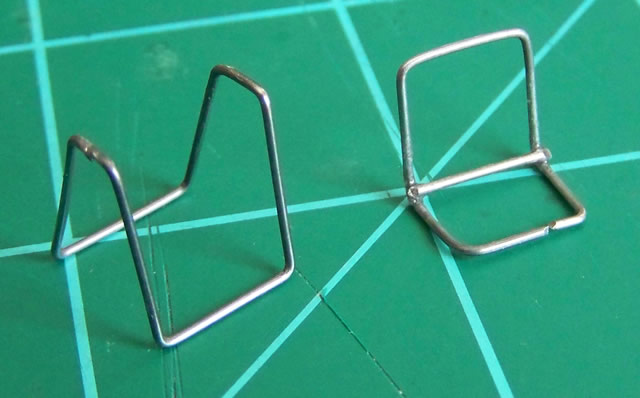
Because you will not have a square cut on the ends of the wire, make sure that the break in each bent frame is in an area that will be hidden. For the chair seat / back, put the break near the middle of the lower front wire, as this will be hidden under the webbing. For the legs / arm rests, put the break on one of the top portions that will be hidden under an arm rest.
The webbing for the lawn chair will be made from just ordinary colored copier paper. I went to Office Depot and bought two sheets [1 white and 1 green] for $.04. You’ll want to pick a sheet that is fairly lightweight. Cut the paper into strips just a fuzz under 1/16" wide. The important thing is to cut the strips quite a bit longer than you need to cover the seat and back, because it helps a lot with trying to manipulate them in place. I would recommend making the strips 2” to 2-1/4” long.
To start attaching the webbing, you’ll want to start with all of the strips that run in the vertical direction of the chair [lower front edge to upper back edge]. Starting at the lower seat, curl the strip around the wire, and glue it back onto itself on the underneath side. This will go easier and faster if you use a fast drying white glue like the Scotch Tacky Glue. This glue will dry in under 30 seconds when bonding paper. You will continue attaching all of the webbing strips across the lower width of the chair. When done, you will then need to snake the strips under the wire at the seat bend, and back over the front of the upper back. Next, curl the strips over the upper back wire, and then trim them to the final length that will allow you overlap each strip over itself on the backside by about 1/8”. Glue each strip back to itself on the back side.
With the vertical strips in place, you will now need to weave the horizontal strips cut from a contrasting color through the vertical webbing. Again, make the strip lengths about an inch or so longer than you need. I found it was easier to weave through all of the strips in a section that overlap the same way... over the outside wire and under the first white strip... at the same time. Then use a dental pick to spread these apart once woven through. Going this route makes the alternate weave strips easier because you have only two strips to weave under instead of three. To weave the alternate strips, curl the strip and poked it through straight down at 90 degrees between the vertical strips, and then curl back the other way to come back from the backside. Don't worry about mangling this end of the strip to get it through. Because you made these strips longer, you just take tweezers and pull the strip out until the mangled end is beyond the end of the wire. To attach the horizontal webbing to the frame, you will use the same technique as the vertical webbing and glue the strip back onto itself on the backside. Start with the lower seat first, and then do the upper back portion. It will be easier if you glue all of the strip ends on one side, and then glue all of the strip ends on the opposite side after you have trimmed them to their final length.

Now we are ready to assemble the chair portion to the legs portion. To get the chair level to the bottom of the legs, take a piece of 5/16" square tubing and set it over the lower leg runs. Next, place the chair portion on top of the tubing, and align it so that the straight wire at the bend from chair seat to chair back is just inside the back legs. Use some CA glue to glue the points where the chair portion comes on contact with the leg section. When the glue is dry, slide out the square tubing.
To make the arm rests, use 1/32" thick basswood and cut a strip 1/16" wide by at least ½” long. You will want to have a good contact surface for the arm rests to attach to the wire. Use a dental pick to form a groove or notch running down the length and on the backside of the strip that will be set over the wire. Cut the basswood into two 1/4" long pieces, and then CA glue them onto the wire. When dry, you will need to apply a stain to color the arm rests whatever color you would prefer. On the chair I made, I used a natural redwood stain from a sample pack I got at Lowes to stain the basswood.

It took me about an hour to bend up the wire, about 1-1/2 hours to weave the strips, and 15 minutes to make the arm rests. If you do this as a production run and make several chairs at one time, It will go a lot quicker. It takes a little bit of time to initially size your bent wire frame and to learn the best way to weave the strips.
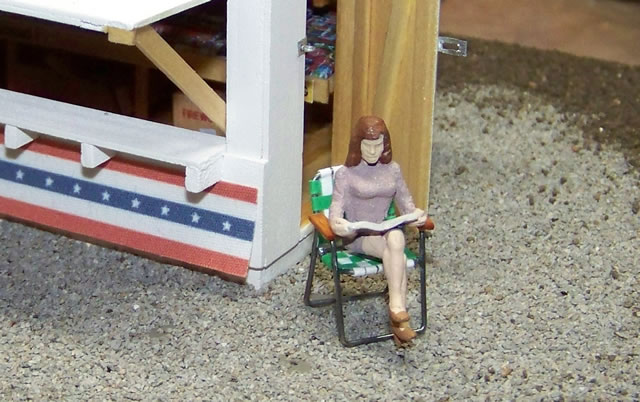
This project may “appear” to be challenging, but it really is pretty easy once you started bending the wire and weaving the webbing strips. Don’t be intimidated…. Just jump in and you’ll have fun making a sliver of Americana that is seldom seen on layouts. You CAN do it!
No comments:
Post a Comment