Wednesday, May 21, 2008

Detailing Tunnel Portals by TMM


I appreciate your interest in my detailing of the subway portals and based on the number of questions I have received, I decided to put together a tutorial on this project. This is my first attempt in making a tutorial so please bare with me.

The first step is to purchase the paint. The products I chose were found at my local Michaels Craft store, but I'm sure comparable products are available at any craft or art supply store. The colors I chose for my portals were: dark gray, light gray, tan, green, white, and black. While the white and black are needed for added details such as a wash and drybrushing, the colors you choose for your portals are certainly up to your own eye and imagination. I used a foam brush for larger areas, and two artists brushes for details: one small (for mortar joints) and one as wide as the stones in the wall (for dry brushing on the final top coat).

The tunnel portals are MTH and cut and fit together to form one wall with three portals. Once again, any brand of plastic portal can work for this project. I don't know if the same steps can be taken on plaster cast portals as the plaster tends to absorb much more of the paint than the plastic, but perhaps a similar procedure would yield satisfying results.

Originally I was not going to do any detail and spray painted them with Testor's gray primer to take some of the 'shine' off of the plastic casting. If I was to do this again I would probably skip the gray primer spray, however it is entirely possible that the primer paint allowed the details a better surface to adhere to than the slippery plastic alone.

Step 1. Painting the Stones
Squeeze out all four colors onto a scrap piece of cardboard, foam, etc. ; anything handy.

Next using the foam brush dab the brush into one color and dab onto portal wall in a random pattern. Do the same for all four colors. Don't be fussy and overlap.

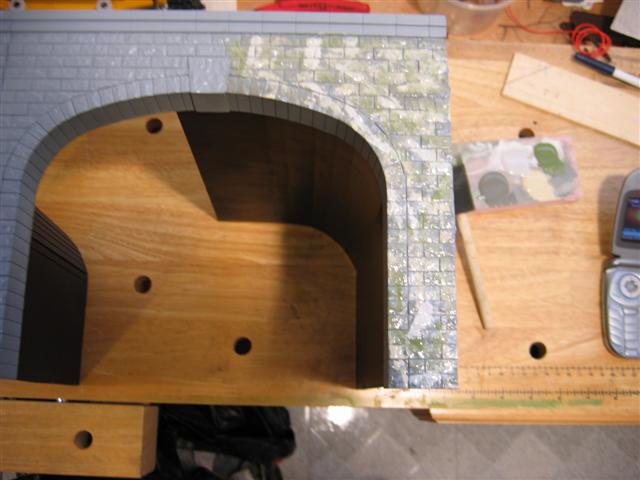
Then using a paper towel, dab the portal wall to blend in the colors. This is what it should look like.

Step 2. Detailing the Joints

First dilute black paint with water, you may want to experiment a bit with this step as different mixtures might work better than others. I used about a 30/70 mix of paint to water to achieve the 'viscosity' that i desired. Keep in mind, the more paint the thicker the mix and less likely it will be to flow easily.

Paint on top of mortar joints with diluted paint mixture using small artists brush. Don't worry about getting paint on stones.

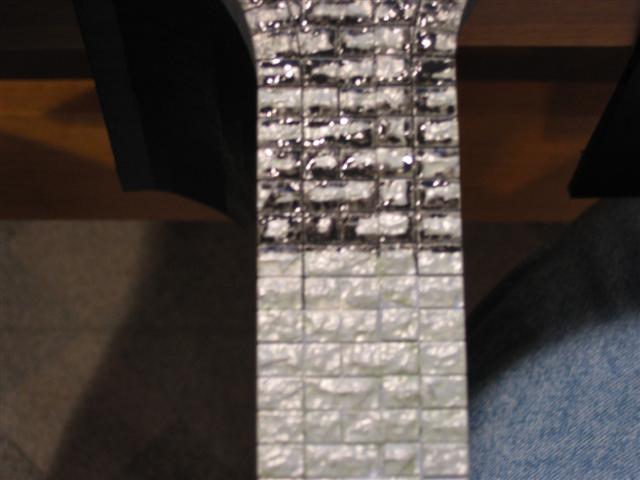
This is what it will look like.

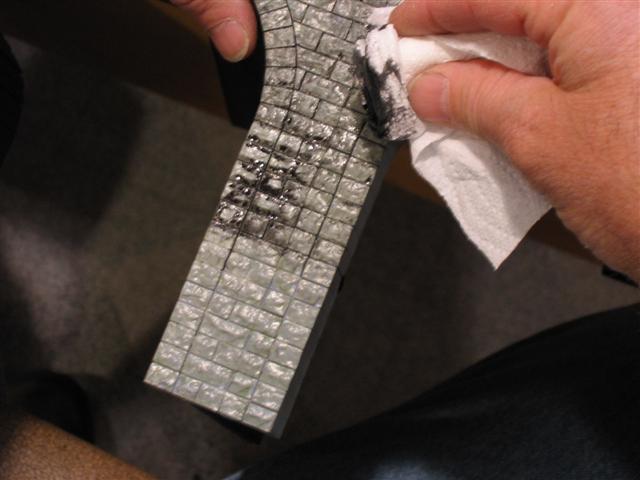
Next gently wipe excess diluted black paint from stones, leaving black paint in mortar joints. If you wipe it out of the mortar joint just reapply more paint and wipe off again.

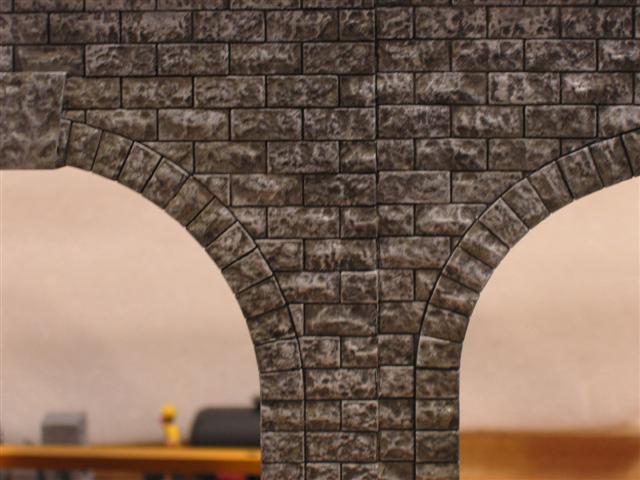
I left a little hint of black on the stone to add more depth by bringing out the recesses and variation in texture of the rock blocks. This what it looks like after the wiping.

Step 3. Adding Highlights

Squeeze out white and light gray paint onto pallet.

With the larger artists brush, Dip into light gray and wipe off any excess, dab brush on paper towel to remove more paint (dry brushing).

Then apply paint to top of stones using a light touch and random action in you brush strokes. Repeat with both light gray and white until desired affect is achieved. I recommend dry brushing the light gray first, allowing the application of the white dry brushing a chance to really bring out some of the highlights.

Step 4. Cap Stones

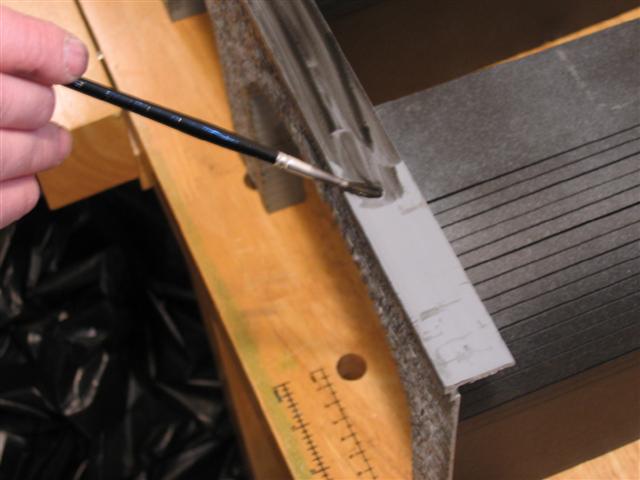
Using the larger of the two artists brushes, smear on a coat of diluted black paint (again a 30/70 combo of paint to water or whatever combination you wish).

Gently dab off black paint, let dry a few minutes, dab on more diluted black paint with paper towel until desired affect is achieved.

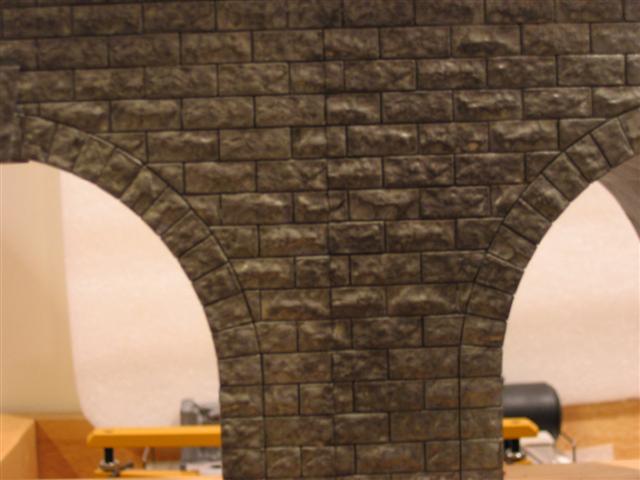
This is what it should look like.

I hope this was an informative post and hope you can use this in some of your detailing work. Different colors could be substituted for different looks. Different color mortar could also be used. This project offers the modeler many different options color wise, which I feel is part of the appeal.

I was a little reluctant in the start to try this this but after the first portal I was glad I did. What a difference it made in the overall look of the portals. I am amazed in how simple some things are. In doing scenery I really don't think you could make a mistake as nature isn't perfect. Thanks again to everyone who expressed an interest in this project and I hope many of you can learn from this tutorial.

Monday, May 19, 2008

Making Plank Flooring & Siding by Gizzmo


I've been working on a timber-frame building for my layout. When it came time for some flooring I decided to make my own. It came out so well I though of posting the method here. I started with couple of blades from a sheet-rock knife.

First I dulled the blades and ground one to look like this:

After grinding a slight curve on both ends of the other blade, I created this by gluing them together with a piece of wood between them. I used CA glue with a 'kicker' to cure it. Make sure you rough up the areas being glued both on the metal blade as well as the wood to help with the bonding. The glue took about 15 minutes to set up and provide a firm hold.

Nothing too critical here. The idea is to use the wood to separate the blades and to limit the depth of the scribe / cut. The blade with the curved ends is the guide for the tool. It travels in the last groove made. Using this gizzmo is fairly easy and straightforward: just slide it along one edge of a piece of balsa wood sheeting to make the first groove. Then put the guide in that groove and slide it along to make another. When applying the pressure, make sure that its just enough to notch the wood, but not enough to crush it. Here's a look:

Make sure the edge of your balsa wood plank is true. Since this will be used to scribe the first line of the simulated planking, you want to make sure this line is as true as possible. Make sure you make a couple of passes making the groove nice and pronounced so that it becomes a good footing for the guide on the blade when scribing the next line.

When I was done with the whole piece I stained it with some Minwax Early "American" stain.

Looks just like flooring ! I'll be using this on my buildings for flooring and I think with the right color it will make a fine plank siding too.

Tuesday, May 13, 2008

Ash Pit Scratchbuild by canalman


Back in the late fall of 2006, I received run 217 of OGR magazine which featured an interesting article by Carl Capua entitled "Building a Brick Retaining Wall". Ever since reading that article, I've been looking forward to having the opportunity to use his technique to capture the look and feel of brickwork. Recently, I was able to use what I learned from the article on a small and simple Ash Pit scratch build project.

The first step was to build the "pit" itself. I am using Atlas track so I decided to make the ash pit fit under one 10" section of track. This is long enough to park an engine firebox over it, with room to spare, and looked about right for the platform location. Basically the pit should be deep enough to allow a number of ash loads to be dumped from the engine's pan without approaching the height of the rail head, wide enough to fit under the width of the rails and still provide enough support and space. I used 1" deep as the clearance from the I beam that supports the track to the floor of the pit. That would be about 4’ for an actual pit. For the sides and ends, I cut the foam to the right length and width then cut it in half in the 1" dimension. I used a small band saw for all cuts. I had used a Dremel Tool to remove the ties from the center of a 10" track section that would be placed over the pit. I left 2 ties at each end to maintain the proper gauge for the 10” section. I used 2 pieces of 3/8" styrene I-beam over the span to simulate steel beans under the track.

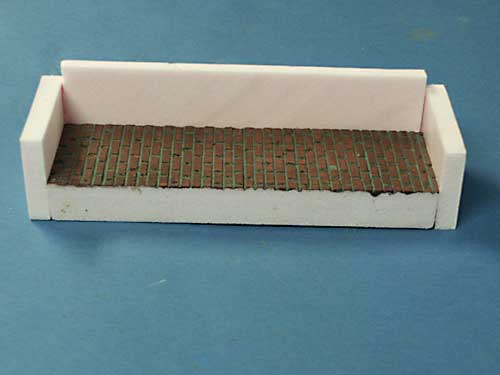
I started construction with a piece of 1" thick, pink foam insulation. This is the same stuff that you get in 2' X 8' pieces at almost any home center such as HD. I used the "pink" variety since that's what I had some scraps of but I think the "blue" version would work as well. The photo below has the 3 sides glued on but I started with just the bottom piece for the brick. Using a small, pencil tipped style of soldering iron, I set about using Carl's technique to simulate the recessed mortar lines that appear between bricks. Please work in a well ventilated area as the fumes that result can be a bit overwhelming. Using a Weller pencil point iron, I found that you needed a steady hand and constant speed to make reproducible mortar lines. I found on my first try that the foam melts quickly so on try 2, I had a much gentler touch and moved the iron quickly across the foam. I still had "fat" grooves where the iron first contacted the foam so on try 3, I put a 2" piece of scrap where the iron first contacted the foam. That way, I had attained constant speed and pressure by the time I reached the desired area. For the vertical joints that define each brick, I found using a Dremel Tool with a small round bit to just nick the foam between bricks worked well but a better way is to just use a small flat blade screwdriver and depress the foam between bricks. This went quickly and was easy to do.

Once the pattern was created, the next task was to paint the floor to bring out the brick and mortar work: I used Acrylic paint from Wal-Mart; American Russet Roussatre for the bricks and Pewter Gray for the mortar work. I painted the entire surface with the American Russet Roussatre first then, after it dried, added the Pewter Gray for the mortar. Just wipe the excess off the surface while it is still wet. After the paint was dry, the sides and back of the pit were then glued into place.

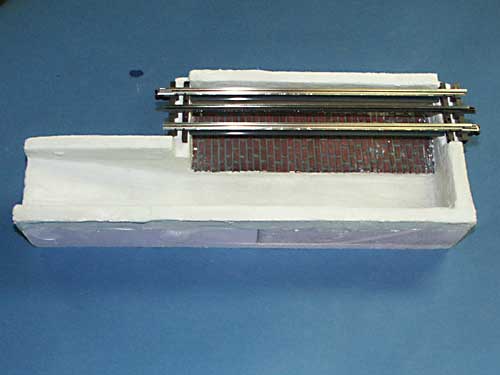
Early ash pits were emptied by hand while later designed used various forms of mechanisms, the most basic of which was a simple ramp. Looking at the end view in the next photo, you can see how I glued 2 pieces of 1" foam together to get the desired 2" width. Once again, I used the band saw to cut the shape and then glued that to the existing pit. Note that the area where the track goes is slightly lower than the sides. Since the bottom of the track is at platform level and I was going to recess the ash pit in the platform, I wanted the sides of the ash pit to extend 3/8" above the platform so that’s why the sides are a little higher.

It’s been my experience that covering foam with plaster cloth improves strength and whatever you finish it with will hold better. It also covers a multitude of sins! I used Woodland Scenic plaster cloth to cover everything that would be visible but the brick floor. It's a good idea to cover the brick to protect it from any plaster cloth that might "get away" when you are installing it. After putting on the plaster cloth and smoothing it out, I went over the surface with plaster of paris (using my finger) to simulate a poured concrete texture. Once dry, I brush painted the entire surface with a white and gray acrylic paint mix to get an aged concrete color. I also used a magic marker to put a few cracks in the concrete then sprinkled some woodstove ashes in the pit. They are not held down since I have an unlimited supply so if I loose a few to the vacuum, it's no problem! I suspect you could stick them down with Dull Cote but I haven't tried that.

I have wanted to try using chalk for weathering so I tried that technique for the final weathering. I bought a mix of pastel chalks from Michaels but any craft store would have them. You can simply scrape off a little of the surface of the pastel stick and use a dry brush to "powder" it on. Smear it around a little and Wow- it actually looked pretty good! To hold it in place, I sprayed a light coat of Testors Dull Cote over it.


This being my first scratch built, I used several pictures of various types of ash pits so I had a basic concept of the build, but found that most of it was "design as you go". Looking back, it was actually a fun project that turned out OK and the cost was nearly zero since I had everything on hand. If you've never done anything like this before, go for it! Fellow forum member and regular Scenery Section contributor Rand Fredricksen gave this build a shot and you can be the judge of his success!


Based on the success I had from my first scratch build, my next project is a little more ambitious. I am building a model of an existing water tower. Again, it's a learning curve for me and since it is made of wood, it could turn into ash for the ash pit if I really mess it up!

Thursday, May 8, 2008

April Token Build: Wire Trees


Thanks to all of you who visited and voted this past month on the April Token Build. This is the second in an ongoing series of what can best be called a "community build". Every two months, a Token Poll will be posted here on the blog listing a number of choices for the upcoming Token Build. While some may vote merely to see others attempt the build, the concept functions much better if those who take the time to vote also participate in the project. After 39 votes, the Wire Tree Build beat out the other choices to become the build of the month. Five brave souls signed up over on the OGRR Scenery Forum and stuck with it to the end. With their permission, their pictures, hints, and tips have been used to help you with your first attempt at twisting, barking, and dressing a wire tree.

Step One: Find A Tree


I know this seems like a no-brainer, but many of us modelers have gotten accustomed to settling for the generic plastic, pre-flocked schlock that passes for trees on the mass market in our hobby. Dont get me wrong here, I have had them on my layouts as well and they certainly play their role creating shade along streets and rails. But have you really noticed the amazing variety of trees and their shapes in the real world? Its astonishing when you really start to see the trees and not just the forest! Find a tree whose shape agrees with you in some way ... break out of the box a bit, and use this build as an opportunity to add a little uniqueness to your layout and its scenes. Here are a couple of trees chosen by some of the participants so you can follow their progress through the build.


Step Two: Building The Wire Armature

Now for a little info on the first phase of the build: the wire armature. You first need to establish the size of the tree you would like to model. Take into account the girth rather than the height, as the 'gauge' of wire will greatly affect the thickness of both the trunk and the branches. It can be seen that each tree has a unique 'character' which is determined by issues like the number of branches emanating from each split as well as their angle, length and curvature. It's details such as these that give each tree its unique character, and its this kind of build that can accentuate these unique characteristics of the tree type chosen to model.

At your hardware store, you should be able to find a wide assortment of both gauges and makeup. What you are looking for is 'stranded' wire, meaning that instead of a solid, thick wire the wire is instead twisted with smaller pieces of wire. When considering the gauge of wire be aware of the following: thickness of the wire will effect not only the number of branches possible from each 'split' but how thick those end branches will be.

Once you have chosen the gauge the fits your taste, cut two or three sections of the same length, strip the rubber off and twist! I usually secure the base in a clamp and use a wrench to grab the other ends and secure them. While braiding, keep it a little loose and take care to not wind it too tight ... you will have to unravel some ends from the top to create branches.
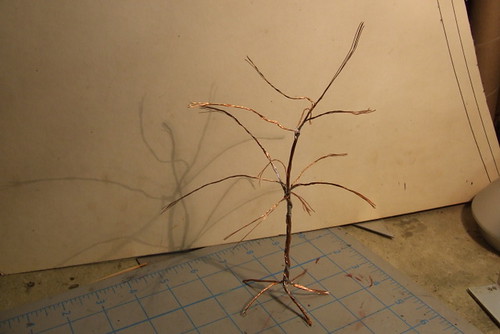


Step Three: Unraveling Ends for Branches

Once you have braided the wire bundles and un-twisted the major branches of your tree, its now time to unfray the tips of the wires to fill out the branches. Slowly unravel the twisted wires to the point on the main limb where you feel the smaller branches should begin. Then, following the same process as with the trunk, re-twist the branches in bundles of two, three, or four individual wires, leaving individual strands untwisted and pointing out the farther out on the branch you go. These are twigs, not branches so as you go farther out from the trunk, the branches should become smaller, thinner, and greater in number.

Take some time to really look at the structure of the tree you are modeling ... different species of trees have different makeups: oaks tend to start branching out from the middle with little to no trunk continuing above the break. Elms tend to gradually branch off as the height of the trunk increases. Use this info to decide how many strands you want to use to start simulating branches. of course, the branches at the bottom of the canopy are longer and thicker than the top.
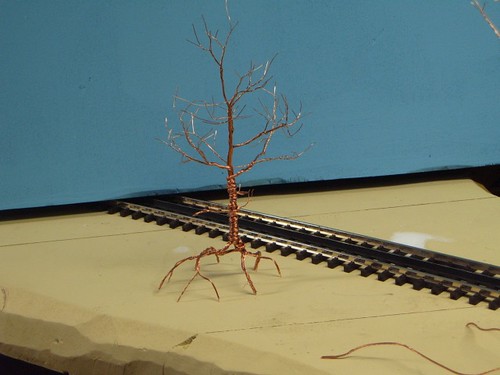


Step Four: Adding The Wood

Once you have the armature twisted and bent to your liking, its time to add the 'lumber'. There are several ways of doing this and modelers have had success with the following products:

1) Wood Filler: The advantage here is that you can choose a realistic color tone pretty easily with this stuff. its malleable and dry time isnt too terrible. Doesnt cling to well to the armature, and will take a few layers ... make sure to wait until each layer is dry before adding to it.

2) Caulking: Easy and cheap, it clings relatively well to the wire, but can get runny until it sets up. by far the messiest of the options here, but one advantage is that the armature can be bent AFTER the caulk dries, offering you a little more flexibility in mounting.

3) Super Sculpey: Found at your local craft supply store, its a clay that hardens in the oven in very little time. Since this is more solid going on, its quite easy to weave and push into every nook and cranny. This also gives you the option of adding details into the clay before you cook it ... knots and broken branches can be added using this method. Keep in mind the clay may shrink a bit after cooking, and it will take on that 'fresh dog poo' color.


4) Mod Podge: This is a tried and true method, which give a lot of control but is very time consuming. The idea is to build up layer upon layer of the 'podge', gradually filling out the tree. While this method is indeed time intensive, it does give the modeler the option of adding texture such as dirt or sand to simulate bark and its unevenness on the tree.


Any of these methods should work well, just go slowly and make sure you get good coverage. problems tend to arise with the thinner tips of the branches ... some of this stuff just doesn't want to stick, or if it does, it ruins the tapering of the limbs. Leave the very tips uncovered if its becomes an issue. Unless you are modeling a leaf-less tree, most of this will be covered in the end. Just let the spray paint do the work for you.
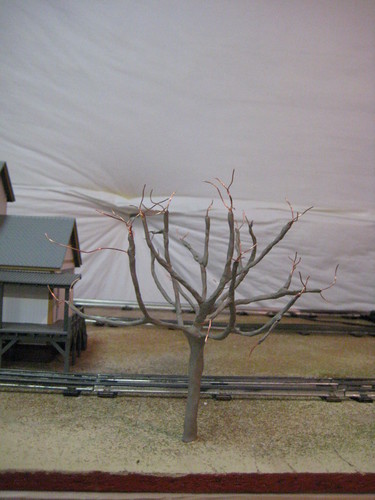

Step Five: Painting and Texturing The Tree

Time to hit it up with some spray paint of your color choice. Choose a latex based paint as it goes on a little thicker and will help coat those tips of the branches a little easier. One hint: experiment with 'textured' spray paints ... they give a nice feel to the trees, and the difference in texture will give just enough of a hint for the bark. Combinations of both the latex and textured paints also gives a nice feel on the tree. To further bring out details, a few alcohol and india ink washes can be used to highlight differences in texture. Dry brushing a lighter shade will also bring out further details.


Another method is to sprinkle texturing agents on the tree while the paint is still wet or after a good dose of Mod-Podge. Here is another opportunity to get outside and enjoy nature a bit ... take a tiny tin or zip-lock bag with you on your next walk with the dog or jog and keep an eye out for interesting colors and textures of sand and dirt: you'll be pleasantly surprised at the discoveries awaiting you!


Step Six: Adding The Greenery

The last step on this wire tree build is the canopy Again there are several ways of doing this, but many have had success using polyfibre as the 'filler' for the bulk of the foliage. Woodland Scenics sells this stuff, but you may even want to take a cheaper route and visit the a fabric store or even the fabric section of your nearest craft store to compare pricing and color selection.

When using polyfibre, its important to make a little go a long way. Tear off a small chunk and start to pull it apart in every direction. a thumb-sized piece of polyfibre can yield a hand size section of pulled fibre: you'll be amazed at how much you can get from very little. its up to you how you want to attach it. Some have used glue, but i just use the tips of the wire at the ends of my branches to lock it into place (the hairspray from the next step will anchor it further). Fill it out, but not too much ... much sure to leave some open areas so that you can see a few of the inside branches through the foliage. this is a more natural look for your tree and gets you away from the cotton-candy look many of these premade hobby store possess.


The last step is attaching the foliage. some use ground cover foam, others just go with the green polyfibre look. Noch sells 'leaves' and although much to large size wise, they make for a pretty good representation of foliage. unscented strong hold hair spray works best for affixing your choice of leafy material to the polyfibre. Spray first, sprinkle 'leaves', spray again to seal the deal. just take care and mask off or try not to hit up the bark or branches with the hairspray ... unless you want leaves of ground foam growing directly out of the bark.

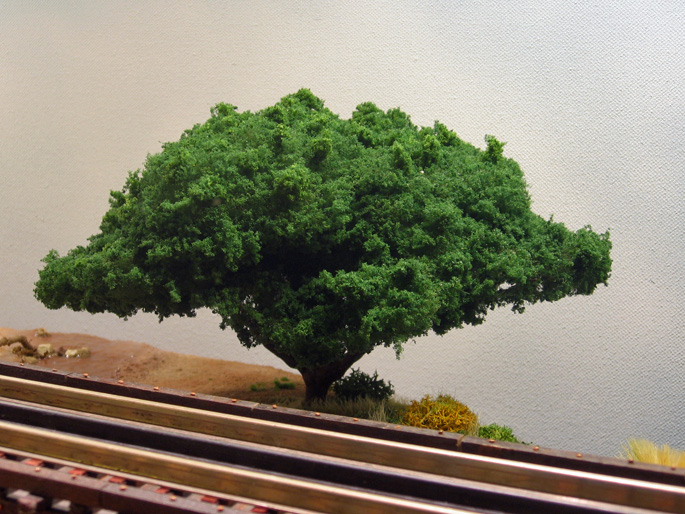


Thanks for viewing this Token Build and I encourage you to vote and participate in the next one. Projects will always be at a skill level that is manageable, a time commitment which allows it to be completed in a month, and with a budget that is reasonably cheap. Our hope is that by encouraging many modelers here to take on the same project, we can all learn from one another's experiences, share tips and tricks, and at the end of the month have something to be proud of to put on the layout. Greatest of thanks to those who decided to give this build a shot and whose pictures and tips went a long way towards completing this post: Vulcan, bfishma, pierz44, Erictrainman, Rand, and csxt30.