Thursday, March 27, 2008

Views from The Cab by Vulcan


A while back I did a little experimenting with Photoshop by taking images I found on the internet that were of real views from inside the cab of different engines. This experiment, as you will see, led to views from inside other things besides engines. The trick here is to use your imagination and your mind's eye and try to see your layout from its population's perspective. In your own personal experience, try and think of the environments you tend to view trains from: through a window at work, from the car at a crossing, even through the window of a passenger car on the opposite track.

This project shouldn't be something frustrating or time consuming ... just a way to have fun with your scenery and your layout. I am always looking for ways to include other 'non-trainiacs' in my hobby, and this provided a unique and amusing way to do so. Ask for ideas, mostly from people outside of the hobby or interest. I have found that those living 'outside the box' often have the most unique and relevant ideas.

This was a view I found from inside an FT at Spencer shops in North Carolina. You can use shots from your own personal collection, or using the limitless power of the internet, you can track down other interesting and unique material for your project.


The way I created these "views" was really quite simple. Of course you need to have a version of Photoshop, or some other photo editing software that allows you to work in layers. Layers allow you to add or delete, text, images, etc. without changing the original layer. This way if you make a mistake you can delete that layer and retain the rest of the image. For those who aren't used to this technical term, layers is exactly what you would expect. Think of each layer printed on transparent paper with only what you highlight remaining. So if you had two layers, the last layer would be the background with the top layer being the foreground.

This view shows the image with the windshield deleted.


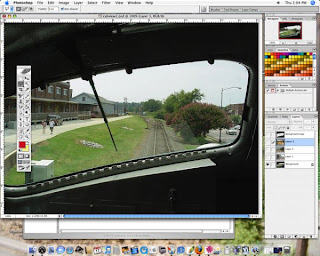
I started by duplicating the original layer, then hiding the original layer. Next taking one of the marquee tools, lasso or pen tool, I traced around the window opening, where the windshield glass is. After this is highlighted, ants marching, I deleted the area. Next I found photos I had of either my layout or modules and copied these into the image on a separate layer. The layer with the model image is then moved below the modified cab image and above the original layer. Some transforming of the model image was done, either reducing the size or distorting to get the proper perspective.


In the above screen capture shot, you can clearly see the unique effect this kind of photo editing can have on a seemingly ordinary layout photograph. Height above the rail and angle on your shot is key to selling the illusion, so keep this in mind when taking photographs of your layout to use for this project.

For you Pennsy fans, a view from the cab of a GG1. The view of the model world has the color toned down to more closely match the cab.


A view from the cab of a Steam engine easing on to the turntable.


View from a caboose. In this image I changed the model photo to black and white to match the "real" image.

Ariel view from from the cockpit of a P47. This was on sort of a dare from a friend: TALLY HO!


View from the Camry. I had to sit in the backseat to get enough cab detail. "Objects in mirror are closer than they appear" ... even in 1/48 scale!


As with many things in our hobby, the route I took concerning this project was not the intended one. In the past, I had seen photos in which a mockup of a simple interior was used as a 'window' from which to shoot a layout or module scene. Originally, I planned to build such a mock up using a printout of an FT cab as a template and afixing it to a piece of foamboard with the windshield cut out. This seemed like an awfully lot of work for a few shots, so in an effort to save a little time I gave the idea a shot in Photo-Shop ... and the rest, as they say, is Token history!
I hope you enjoy this little project and look forward to seeing your own "Views From the Cab" over on the OGRR forum.


Friday, March 21, 2008

March Token Build: The Rural Water Tower


A few months ago when the idea of the Token Three Railer was just taking shape, many of the Token Builders proposed the concept of a "group build" as a possible way to bring modelers together around a common theme. Builds should focus on structures that every layout would need and that anyone with the time and supplies could pull off within a month's time. Since it would be difficult for everyone to agree on what build should get top billing, a poll was set up on the blog asking viewers which of several proposed projects garnered the most interest. When the vote count was finally tallied at the end of the month, the "Rural Water Tower" ended up as our March Token Build.


Four modelers participated in the project: Vulcan, mwb, dgauss, and bfishma and each brought not only a unique perspective, but their own modeling touch and ingenuity to the group build. The information contained here will hopefully highlight the different approaches as well as providing others with tips and ideas for this or other scratchbuilds.


While some worked directly from actual blueprints of prototype structures, everyone seems to have opted to build their Rural Water Tower in separate sections: the holding tank, the support structure, and if applicable a roof. A 'template' such as a section of PVC pipe or a cardboard shipping tube was used in many cases to achieve a rigid base for the holding tank. If these items cant be found laying around the house or the garage, a trip to a hardware store or an office supply warehouse is all thats needed. Cut the tubular section to a height that matches your plans or is pleasing to the eye. Also take care in noting that the diameter of the tube matches the height proportionally.


Wooden strips (known as 'staves' on the tower) were glued in place, side-by-side around the entirety of the cylinder. Strips can be cut from balsa planks, coffee stirrers, or in pre-cut pieces from the craft section of Walmart or Michaels bagged as "Skinny Sticks" by Forester. Work slowly and carefully, making sure that the lengths of the staves are consistent, and that they are flush with one another. Add a few rubber bands to ensure a tight fit while drying.


Next come the 'hoops', metal bands used to hold the staves together tightly. Once again, modelers used a variety of items to simulate these hoops. The bands can be modeled by using .030 styrene rod from Evergreen Scale Models, phone cord wire, or a product called "Rexlace" which is a flat vinyl craft plastic lacing. No matter what is used, the ends of the rods can meet flushly or can overlap. Turnbuckles used to secure the hoops can be simulated by thicker sections of styrene rod cut and glued in-place, bought from a detail company such as Grandt Line, or even twisted together forming a realistic turnbuckle where they meet.


Stringers can then be added to the bottom of the holding tank, standing on end as to mimic most actual water towers. You can imagine how much weight a full tank can entail, so just as your deck's support beams run on end, so, too, do the stringers on a water tank. Once again, balsa or basswood strips can be used.


While some rural water tanks came without roofs, some did and this can be one of the more difficult parts of the structure to model because the height, diameter, and symmetry can be tough to accurately model. Triangular sections can be cut to size then glued together, cardboard or thick posterboard can be cut and rolled to match, or a base of foam board or styrofoam can be carved to form a base for wooden strips.


The support structure is the next logical step. Basswood or balsa wood in different sizes and thickness can be used both as the big timbers and the stringers that hold it together, a common size is for tank supports are 3/16" X 3/16" balsa wood dowels and 1/4" X 1/16" balsa sticks for the sway bracing. Whether working from plans or from your imagination, keep in mind that this structure must be rigid, well built, and well supported.


Now the fun part: the details! Spouts can be brought pre-made (once again from Grandt Line) or can be scratchbuilt. Vulcan describes his process below:


"My spout was made from styrene tubing. Cut to length, I then stuck it into an electric drill chuck and tapered the tube to a smaller diameter on the outside end using files and sandpaper. The grooves (joints) were also cut into the spout at this time. I cut the end at a 45 degree angle then glued another short section of tubing to the end to get the turned down portion. I made a hinge by taking a piece of brass sheet stock and Krazy gluing it to the spout and added a piece of brass tubing to the other end. "


That spout is going to need a framework to support it and anchor it to the tank's structure as well as counterweights and perhaps a pull down chain for the spout. Other details can include the feed pipe running from the bottom of the tank to the spout, the pipe running from the ground to the tank, a water gauge, concrete stanchions to support the superstructure, a drain for the runoff, even a wind-vane on the roof-top! Vulcan's build based on Southern Railway plans didnt require a top which opened the door for another unique detailing project:


"Since my tank is open I added water. The water was made using a piece of clear blister material, commonly found in packaging now days. Using the tank as a guide I cut a circle out of the blister material and set it on the "shelf" formed by the shipping tube being cut shorter that the staves. The blister was then coated with numerous layers of Mod Podge. I usually did this when I was ready to put up the project for the night or had to let it set for a while while something else set up. I also added a few washes of green between some of the layers. The reason for the green is, I have a rain barrel set up outside and noticed when ever I got some of the water it always has a green tint to it. So it stands to reason an open tank could have the same effect."


Keep in mind, there is no right or wrong way to detail this project ... just do what feels right for you and your layout. Its our hope that this post and the build will benefit others as much as it has helped those of us involved. Please take the time to look over the choices for April's Token Build on the poll located to the right of this post. Your votes and feedback is greatly appreciated, as is your continued participation both here and on the Scenery Section of the OGRR Forum.


Saturday, March 15, 2008

Tool House....Project by Vulcan

This is a small project I have been working on for my rural station module. This segment does not include a complete "how-to" but rather covers parts of the build not covered elsewhere. Officially, according to Southern Railway's Standard Plans it is called a TOOL HOUSE. Most would recognize it as a speeder/ handcar shed.


This is the completed, or at least 90% completed shed. The exterior sheathing is Evergreen Models styrene, # 4101 Clapboard.


This view shows the roof. I made the diagonal shingles by using a pair of Pinking shears to cut strips from cardstock. The shingle strips were then added using 3M spray adhesive. Once the strips were added I sprayed the roof with more of the spray adhesive to add some texture to the roof. Once that dried it was sprayed a flat black. Then weathered by dry-brushing with white acrylic paint.


The window is from Grant Line Products. I wanted an open window so I cut the mullions from the lower part and built a frame around the removed mullions using .030 x .030 Evergreen Models styrene strips. Then glazed the upper and lower section with .015 clear styrene.


And since it does house a handcar, here is a shot of the handcar. For the interior of the shed walls I used Evergreen Models styrene, # 4083 Novelty siding.


For the details on how I painted and weathered the shed, please go to the January folder and see the "How to achieve that rustic look" post. The foot print of this neat little shed is 2 1/2 x 3 9/16, not including runway section. The runway is built using HO gauge rail, set to O gauge, five foot. The wood planking is a product made by Forster called "Skinny Sticks". Similar to coffee stirrers but much more uniform.

Hope you enjoyed.

Friday, March 14, 2008

The Art of Model Railroad Photography by Dennis Brennan

Some of you may have seen this photo in the four part series featured in the Dec. ‘07 through March ’08 issues of Classic Toy Trains: Build the Sandy Harbor Terminal Railway.

What makes a model railroad photo stand out? Much has been written about the technical aspects of miniature photography but hardly anything about the aesthetics. By using one of my favorite shots as an example, I’m going to talk about the art behind the science.

If one didn’t know it was a model, one might think it’s real. My daughter said she saw that very scene on a taxi ride from LaGuardia airport to a hotel in Manhattan. Others have said it evokes memories of Chicago, Detroit or Newark.

So what is it about this shot that makes one do a double take? Is it the modeling, the lighting, the composition, the color, the details? The answer is, it’s all of the above. But even more than that—it’s ordinary. It looks like a photo right out of a scrapbook from the 50’s. The picture has a snapshot quality—like the photographer just happened to be in the right place at the right time and captured a fleeting moment.

And therein lies the magic. The careful composition doesn’t appear staged. That’s because I didn’t make a hero out of any one element. Initially, the eye travels from the train down to the bus, across the tenements to the billboard and back. Only after that initial overview, one begins to notice the little things. Even then, no single detail holds any more significance than any other.

From the luminous blue sky to the gravel strewn street, everything looks completely natural. Subtlety is the key. If one thing calls immediate attention to itself, it’s overdone. Many modelers mistakenly assume just the opposite. Remember, less is more. The imagination is a powerful tool. A few well placed foreground details and the mind’s eye will fill in the rest.

Thursday, March 6, 2008

Modeling A Rural Crossing: Project by bfishma


Growing up with trains, it was only natural for me to daydream about having certain features on my layout one day. Above, you will see me running my Marx switcher in the midst of just such thoughts! Tunnels, bridges, and operating signals were always towards the top of my list. But there was one thing I always wanted, and that was a railroad crossing! As a kid, it was the flashing lights and the movement of the guard arm that fascinated me ... after all, more often than not, it was at a crossing that i got to witness the passing of a train. So naturally, I associated the flashing and bells with the 'opening act' of a great show.


As with many things in life, as I grew older I seemed to lose the passion for all the pomp and circumstance in life. Whether its was the clearer perspective on the need for comfort in silence, being in a world of constant noise all the time (internet, computers, 300 channels!), or just the cynicism of old age, suddenly the 'bells and whistles' I once longed for no longer seemed to ring true. Instead I longed for simpler, spartan times ... a post and two boards would certainly do. And so it was with this thought that I decided to tackle the unique approach a rural crossing would offer to a modeler just starting out on learning the art of scenery work.


I have no layout at the time as apartment living precludes anything more than an occasional oval on the carpet. Therefore I work on what I call shelves: 40" sections of shelving that I hope to once again return to the walls of my den. I have had the same shelf sections for the past three apartment layouts, and they have seen action twice on around the room shelving. All curves are O-72, and the combination of the wide radius and long straights has a pleasing effect. Below is a video of the same layout back in New Orleans in my college apartment.

Each section is made from 3/4" plywood as their base and then two sections of matching 3/4" blue foam. the foam is then carved to match the base and topography for the intended scene. For this project I took one of the pre-existing sections and removed a piece from the middle with a long bladed hack saw. I then fashioned a section composed completely of blue foam (3 sections to equal the height of the original section) which was then shaped to fit into the unoccupied space. It was easier to shape the grade of the road before attaching it permanently, and you can see the work on the intersecting section.


After the section was glued into place, plaster of paris was mixed and used to patch up the gaps between the newly mated sections. Cardboard strips were measured and then cut to match the grade of the road on either side and between the rails. By folding the ends, I was able to get the height just right. Remember these two tips: 1) make sure that the cardboard sections are not high enough to meet the top of the rails, especially on either side of the third rail. Dirt and gravel layers will eventually add to the height of the road, and the pick up roller will need to run along the center rail flush. 2) The inner part of the wheel is larger in radius than the outer (the lip that keeps the wheels on the rails) ... make sure you leave plenty of room for the wheels to rotate freely through the crossing. Constantly check for clearance throughout this project to avoid unforeseen problems down the line!


Mixed up another batch of plaster of paris to build a base for the road and the scenery on the sides. Build up layers, making sure the earlier layer is dry. Dont be afraid to make the mix a bit lumpy, adds this will add to a more random look to the surface.


Once all is dry and set, I painted a few washes of brown, red, and white paint. I began to add layers of dirt and fine buff gravel. Take care in mixing the two as the color combination in important as a realistic base before adding the gravel. Growing up in Alabama, I wanted to emulate the 'red clay' that seemed to be everywhere and always on my shoes and shorts. Keep your eyes open on drives around your neck of the woods and see what colors will work best for the scene you want to model.


Larger pieces of gravel, close in size to the ballast used for the track was added to the areas on the road that would see the least wear ... on the edges and down the centerline. This is a two lane road, and I was worried a bit that it looked like a single lane with the larger gravel in the middle, but pictures of gravel roads with traffic going in either direction show this type of wear ... as you will see in after more layers, it stands out less.


A nice mix of both dirt and fine gravel were then layered on top of one another, taking care to keep the rails clear of obstruction. With each layer, make on the spot decisions and go with your gut ... you can always go over any mistakes with consecutive layers.


Once I got the look and the height correct, I added bushes, grasses, and other types of ground cover. Here is the finished product.


Now before I got some lip about not playing it safe by adding some rural crossbucks to my rural crossing project, check the April Token Build and do your duty and vote! I look forward to sharing more 'builds' here and seeing how other modelers tackle similar projects.