Friday, January 11, 2019

The Diner Story

Back in late 2013 I was looking for something to do, I get restless when I'm not modeling. I had an old K-Line diner packed among the storage items. So I came up with this. Eventually.


But first the story behind the Diner that came long before my version. It started out as a 

Marx Trains accessory.


Marx Trains went out of business in 1974. Much of the Marx tooling was bought by K-Line Electric trains soon after. In the mid 1980's K-Line made some minor changes to the tooling and started producing this:


In the early 2000's the Diner again went through some modifications, producing this:


And that's where I come in. The main modification I did to the original shell was to add to the height of the doors. They were only six feet, it probably didn't matter, but I couldn't get past it. This meant removing the section of the molded-in base below the door openings and building new doors. 


I then tore out the interior that was in the Diner and added my own interior walls.


And then it was on to scratch-building the interior details from many different materials.


Including the jukebox.


And, of course, that led to this.


Monday, January 7, 2019

Modeling A Grade Crossing: Project by bfishma


"Growing up with trains, it was only natural for me to daydream about having certain features on my layout one day. Above, you will see me running my Marx switcher in the midst of just such thoughts! Tunnels, bridges, and operating signals were always towards the top of my list. But there was one thing I always wanted, and that was a railroad crossing! As a kid, it was the flashing lights and the movement of the guard arm that fascinated me ... after all, more often than not, it was at a crossing that I got to witness the passing of a train. So naturally, I associated the flashing and bells with the 'opening act' of a great show."
                                                                                                     --- Thursday, 2008 


Hard to believe that it’s been over a decade since that first build here on the Token3Railer.  As I said ten years ago in my original post,  life circumstances tend to creep up and interfere in the ebb and flow of things and so it was with blogs, trains, and scratch building.  Balsa wood, exacto blades, and three rail track got packed away. Fiances hit the road, jobs changed, and moves were made.  Scratch building, the joy that came with creating, and the friends I made on these scenic adventures took a back seat to life’s trials and tribulations.
So I only thought it fitting that my first Token write up should be another attempt at a crossing, this time adding a few of the associated flashing bells that would go with the opening act of a great show ... naturally.
 
I continue to adapt the shelf layout approach with sectional track as a Token Three Railer I did a decade ago to meet my needs as a scenic minded, scratch building modeler.  I've tweaked it slightly but the philosophy remains the same.  As a perpetual bachelor in the teaching profession who rents, its the best I can hope for.
Ten years ago for the original build I utilized MTH Realtrax which worked great: sturdy product with solid and blackened center rails.  Only real issue I had was with the tie spacing.  Blue insulation foam which I carved to shape was placed underneath with plaster and cardboard to cover the spacing between the rails.  I believe 3/4 inch plywood was the base.  Solid as a rock.


Within the last few years I have been gifted a few Lionel Starter Sets and come into the possession of some FastTrak.  After super detailing it have grown to like it.  More cheaply manufactured, it does have its drawbacks: loud and prone to damage because the rails are hollow and the center rail is not blackened.  However the tie spacing is much more prototypical and the rail height not as pronounced, making it more pleasing to look it.  Painting the center rail a flat oily black, rusting up the outer rails, weathering the ties, along with adding and weathering ballast makes this relatively "cheap-o" track look very realistic.


In the interest of saving weight and space, I went with a thin layer of homasote topped with one layer of foam board.  Small elevation changes and the grade of the crossing were made using SculptaMold.


Using styrene I scratch built a storage housing for the signal units to hide the electronics that control the flashing lights.  Of course its out of scale being too large but I based the dimensions on a Lionel IR device so ... does the trick and I enjoyed weathering it. Threw some gravel down and washed it with some brown and black inks.  Tricky part came in with how to line it off with the gravel and still give it a distinctive edge.  Would be too difficult to get a marker or paint brush into the nooks and crannies.  So pulled apart some TP down to single ply (making sure it was the kind of toilet paper without fluffy designs and shit) and carefully cut it into strips the same width of line I desired.  In a shallow sandwich tupperware bin I mixed up the standard white glue, hot water, drop of dish soap mix and gently with tweezers ran the strips through the mix.  Delicate procedure mind you ... requires a cool hand and a glass of bourbon after but I'll be damned! With some patience, a wet brush to coax it into the depressions, and a few qtips to soak up the extra ... well you be the judge.


Brown paint on the homasote and foam board, some extra Sculpta-Mold around the edges of the track and grade crossing to ease the eye and mate the edges, and some Static-Grass.  Maybe a bit too much with the grass.  As with everything in this hobby its a learning curve and always something new to learn and someone new to learn from.


Despite all the twists and turns life throws, its nice to know that these three rails always keep me on track.  As I said in the beginning of this post its been over a decade since that original build of the rural crossing and as you can clearly see some things never change. 
 
Its been wonderful to reconnect with the hobby and with my old friend, fellow Token Builder and original member of the Token3Rail Blog, Vulcan.  I hope that with his help and connecting with other members we can once again start showcasing the talent and knowledge that was housed here. Be on the lookout for a February Token Build and look forward to those of you who are still allowed over on the OGRR forum to weigh in on the "Community Build" post.


Sunday, July 25, 2010

June Token Build : Stand Up


Continuing our theme of community based builds, the month of June brought a new opportunity for those participating to hone their skills constructing a stand of their choosing. As with all of our Token Builds, a wide variety of interpretations were displayed yet all within the theme that was agreed upon. I'm sure you will agree that they all did a fantastic job with each one 'stand' - ing on its own.

The first step of all our builds involved creating the skeleton of the structure. Walls, floor, and roofs are often constructed as separate pieces coming together to form the basis for the rest of the build. The stage of the build is probably the most important of all and provides the framework from which the rest of the project takes shape.


The separate sections are then put together to form one piece. What the projects previously had in common now takes shape as unique representations of the builder's personal choice of stand.


Paint, stains, and weathering are added to give the stands some character along with unique details and features.


At last, the final stage: the finished product. With some hard work and imagination, these projects stand tall as their own pieces of Token Art.


As with all of the token builds, many thanks to those brave souls who not only participated but took the time to share the steps in their building process. It continues to be a pleasure to see individual progress and the novel interpretations on our theme. For those who participated, I hope to see you back for another adventure. To those who have considered joining, please stay tuned for our next build in August to see if its something you can stand.

Saturday, July 24, 2010

A Roadside Produce Stand by mwb


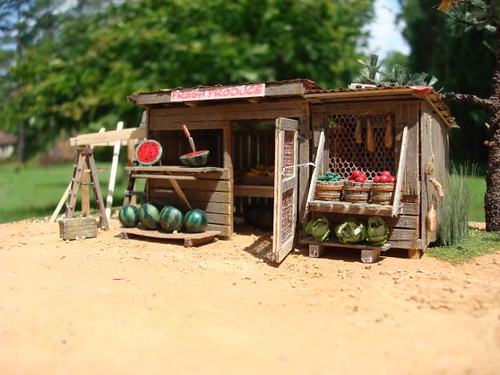
Continuing on with my hiatus from scratch building large structure projects due to both the investment in time and space combined with limited space on my layout, I was looking for a small project that I could take on that would satisfy my interest in board by board construction.

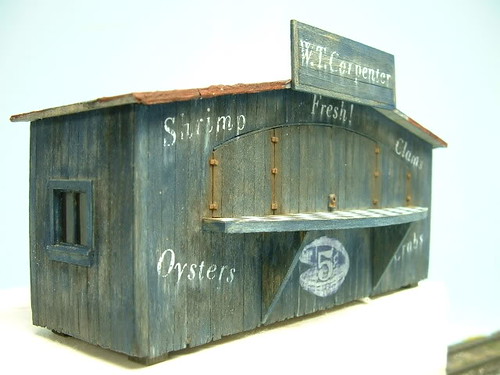
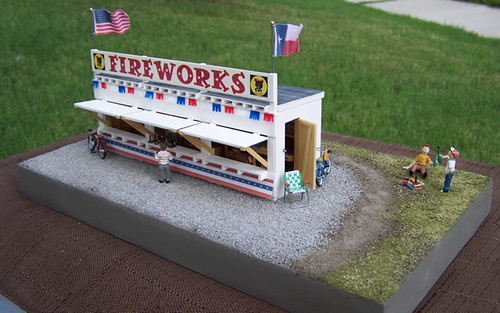
A picture of a kit for a road side refreshment stand caught my eye, but since my layout is of a very rural farming setting, I decided to transform that picture into a road side produce stand building project.


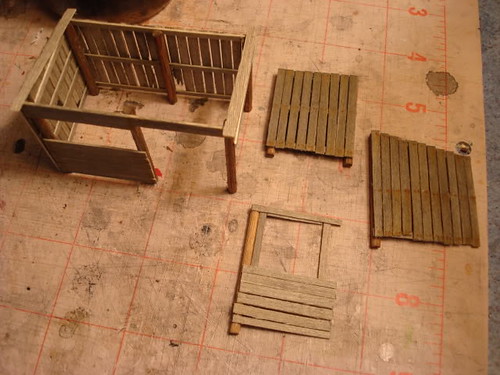
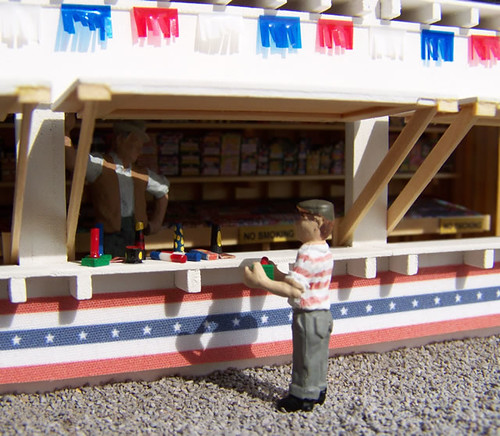
The plan & design for this structure was have a small building with a false front leaving the interior framing exposed. Two side windows and 1 large front window that will be hinged to open upwards were part of the design for both displaying and selling produce which would require some shelving to be installed flush in the window areas. The exterior will be done up with board & batten siding.

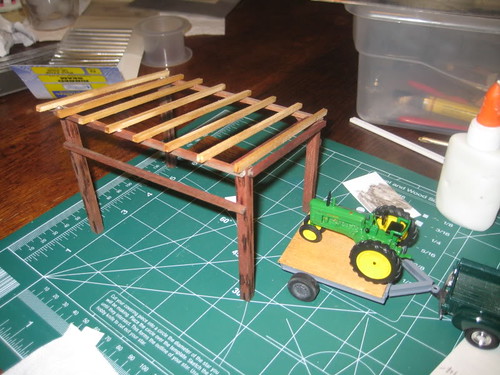
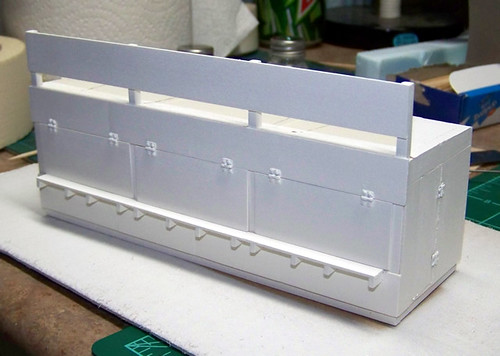
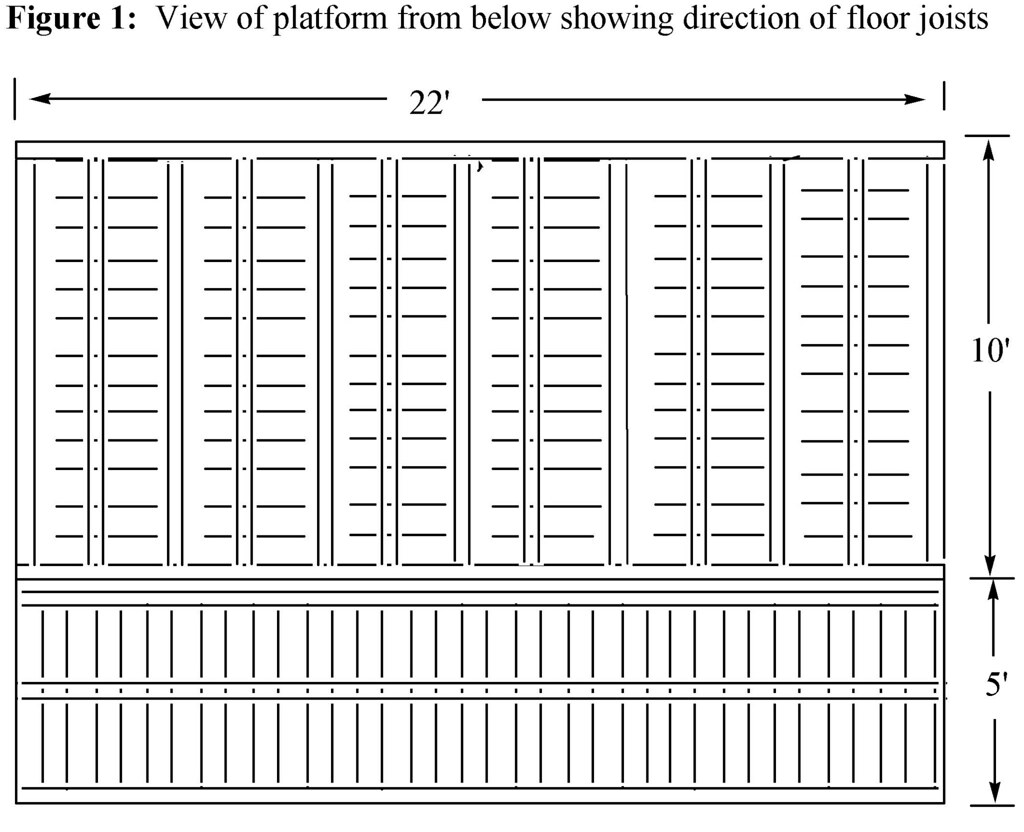
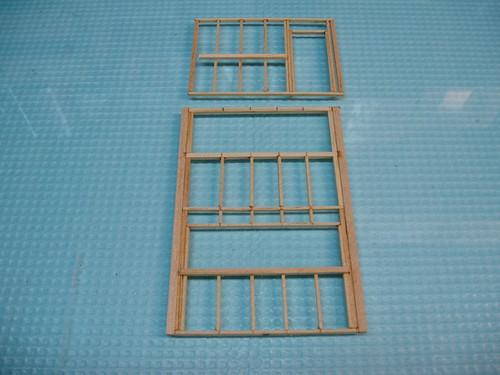
The construction starts with the platform for the stand (Pictures 1 & 1a, Figure 1). This was envisioned to be basically open wooden joists setting on the ground with floor boards holding it all together. I started out with a 10’ x 22’ section of scribed siding (1/8” x 1/32”) with some HO 4” x 22” joist cut to 9’ 10” set at ~ 2’ intervals. The end was then capped with 3 HO 4” x 22” joists cut to 22’ long. The exposed surface that this created was used to anchor a 5’ x 22’ section of scribed siding (1/8” x 1/32”) oriented at right angles to the other flooring. Two more 22’ joists under this section finished off the platform. The two lines in Picture 1 define where the produce stand superstructure was planned to be installed.


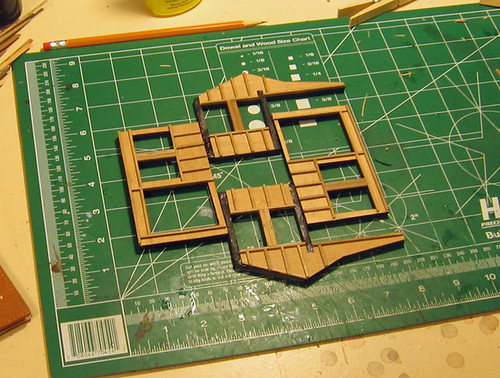
Construction of the stand itself began with the 2 side walls since these were planned to be mirror images (Picture 2, Figure 2). I build it on a section of ¼” plate glass which insures that I have a flat surface and even if I glue the framing to the glass, I can slip a single blade razor or scalpel blade under it to free my work without any damage.

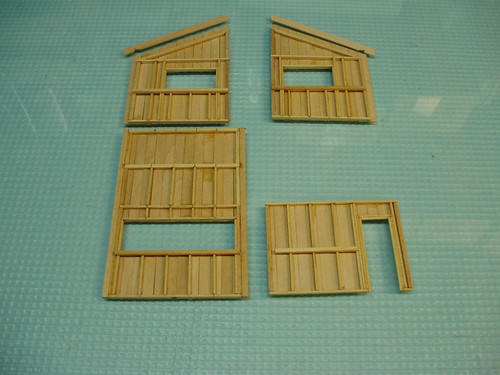
The construction of all of the walls begins with 2” x 4” and 4” x 4” stock and is completely board by board building up the walls pretty closely to how one might do this in reality. The studs are doubled about the window and door opening and since I planned on leaving the framing completely exposed on the interior I really wanted to get all of in place cleanly. I used a Chopper III from NWSL to make consistently long studs and I also use a scalpel for the rest of my carpentry. The 4” x 4” angled support for the outer roof rafter was mortised into place as well to insure a good tight and strong joint. All of the joints that involve end grain were made with Goo while the rest of the assembly was done with ACC.

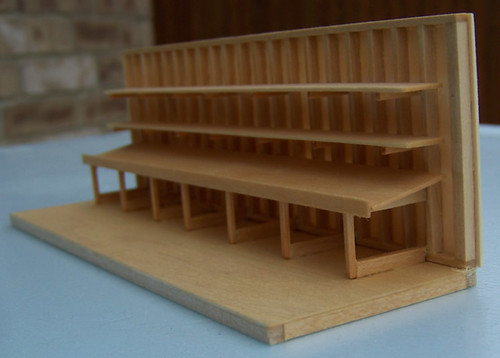
The back and front walls were similarly constructed (Picture 3, Figure 2). Along the interior flush with the top of the bottom of the window openings I added a 4” x 4” to support a “to be added” shelf. The ones on the side walls were relieved so as to allow these to match up when the walls were assembled. A similar section of 4” x 4” was also added across the back wall. The inside of the door framing also received some door stop trim (2” x 2”) so that the door would have something to close against.


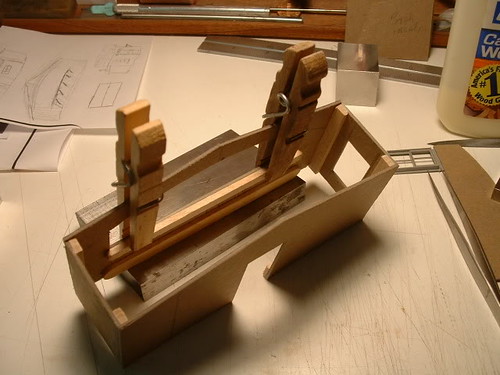
Now, after the framed walls were flipped over to take advantage of building on glass, the exteriors were sheathed with HO 2” x 20” with O scale 1” x 3” for the battens. The window openings were trimmed out while the siding above the angled 4” x 4” on the side walls was left long to accommodate a 4” x 22” rafter cut to match that slope. The sheathing from the backs of the side walls was also left long to overlap with the back wall framing when the walls were assembled (Pictures 4 & 5). This also necessitated mortising the 2 outside rafters and thus all of the rest of the rafters as well.


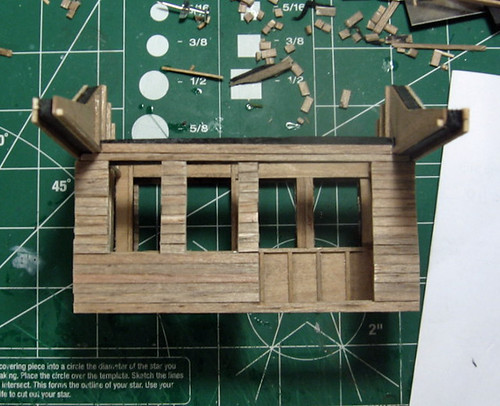
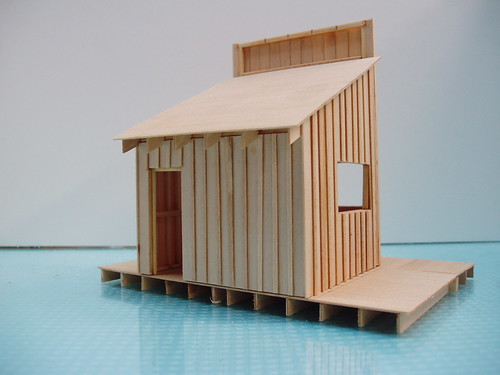
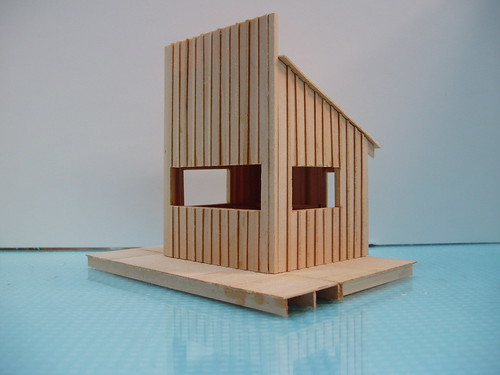
With the 4 walls basically completed, it was time to assemble them into the structure. The back framing of the side walls with the extended sheathing provided a pocket for the corner 4” x 4” ends of the back wall to fit into, also insuring a measure of “square” to the corner. These joints were secured with Goo. The front edges of the side walls were also then secured flush to the back of the 2 main support beams of the false front with Goo. After the walls were set, I planted the entire unit onto the platform centered between those two lines with the back wall flush with the back of the platform (Picture 6). On to the roof!


Ok, this is really a 3 step process.

Step 1 -- MinWax - good old fashioned nasty smelling paint thinner variety - in this particular case - Pecan. why? Because I like the color for interiors and I just slop it on the whole structure inside & out.

Step 2 -- couple of days later (could be sooner actually) a thick coat of one of the Floquil GL (gloss!!!) colors. In this case I used something new - CSX Grey GL. Again, pretty much slop it on wherever the crackled paint affect is desired. sheltered areas of a building don't get any....or not much

Step 3 -- before that paint is 100% dry (I was actually working around a few puddles of the grey this time...), a coat of Polly Scale Aged White...working pretty carefully but quickly....


Now, here's the disclaimer:

I don't know how this works with other Polly Scale colors other than a few when in combination with CSX Grey GL. I tested a handful that I liked for the exterior and the white came up best. What Polly Scale works best with which Floquil GL color over which MinWax is a never ending experiment. I know a few combinations that work very well, and some that don't.

Some barely work at all............

Lastly, it works a lot better if you put down thh MinWax 1st; I think that seals the wood surface and really forces the mixed paint interaction between the solvent based Floquil and the water/alcohol based Polly Scale as opposed to letting the Floquil solvent soak into the wood which also slows down the drying rate.

And, I think there is something to the actual colors as well - 2 that I tested and I tested 7 at the same time on 1 piece of clapboard, completely failed to crackle at all.

I've tested 3 of the Gloss Floquils now each with 7-9 Polly Scale colors - some work great at crackling, some work so-so, some don't work at all.